Video Domestar Frequency 3 Installation guide
DOMESTAR Fréquence 1
- Deutsch: Montageanleitung
- English: installation guide
- Espanol: Instrucciones de instalacion
- Français: Instructions de Montage
- Italiano: Instruzioni per l’installazione
DOMESTAR Fréquence 2
- Deutsch: Montageanleitung
- Français: Instructions de Montage
- English: installation guide
- Espanol: Instrucciones de instalacion
- Italiano: Instruzioni per l’installazione
DOMESTAR Fréquence 3 (3/8)
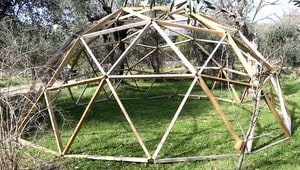
- Deutsch: Montageanleitung
- Français: instructions de montage
- English: installation guide
- Espanol: Instrucciones de instalacion
- Italiano: Instruzioni per l’installazione
DOMESTAR Fréquence 3 (5/8)
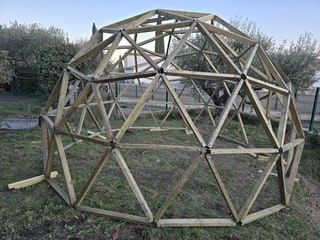
- Deutsch: Montageanleitung
- Français: instructions de montage
- English: installation guide
- Espanol: Instrucciones de instalacion
- Italiano: Instruzioni per l’installazione
Welcome to the assembly instructions for the geodesic dome using DOMESTAR Frequency 3 connectors. If you have any questions, click on Contact to get in touch with me: I’ll be delighted to help you.
Save / Print this page as PDF:
Equipment required
- Set of 46 DOMESTAR Frequency 3 3/8 connectors
- 120 wooden struts (joists) in 3 sizes (see size calculation table below)
- 240 bolts: screws and nuts. I strongly recommend countersunk square bolts (round head, square neck): one blow from a hammer and they’ll lock into the wood and won’t turn when you tighten them
- For the finish, about 150 wood screws
Tools required
- tools for cutting the studs: ideally a radial saw, otherwise a circular saw or jigsaw
- a drill a drill bit the thickness of the screws
- a spanner or ratchet to tighten the bolts, or an impact screwdriver (note: an impact screwdriver is NOT a percussion drill. With an impact screwdriver, you can screw or bolt much more strongly and quickly) or a simple screwdriver
- a hammer to drive in your countersunk square bolts.
- depending on the height of your geodesic dome bench or ladder
Size of your screws and bolts
The bolts must pass completely through the thickest side of the strut and the connector. I therefore advise you to choose a bolt length that is around 10 – 20 mm longer than the greatest thickness of your wood.
If your bolts are less than 10mm longer, assembly will be much more complicated.
FOR EXAMPLE, if your wood is 40x70mm, you will need to drill through 70mm. So use an 80mm or 90mm bolt.
For thickness, I recommend 8mm bolts (=M8)
I recommend using bolts rather than screws. The assembly is much more solid, as the bolts go through. But above all, dome assembly will be easier.
Choosing the size of your dome
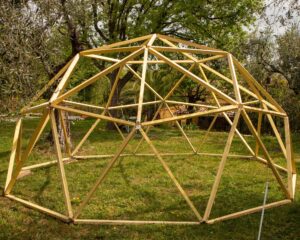
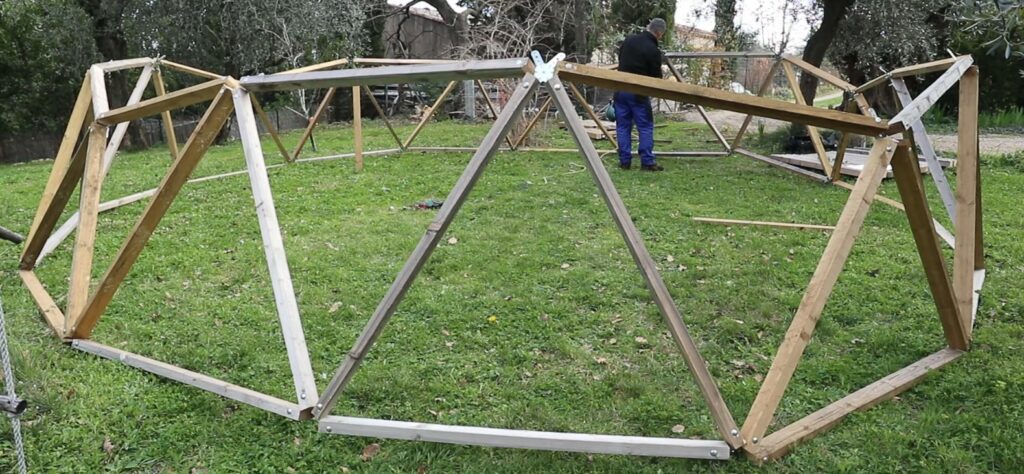
Domestar 3V (=frequency 3) geodesic dome connectors allow you to mount a “frequency 3” 3/8 geodesic dome using only 3 different sizes/lengths of struts. You will need:
- 50 large A-pillars
- 40 medium B-pillars
- 30 small C-pillars
The size of the struts will determine the size of the dome. Height, radius and diameter are therefore determined by the length of the struts.
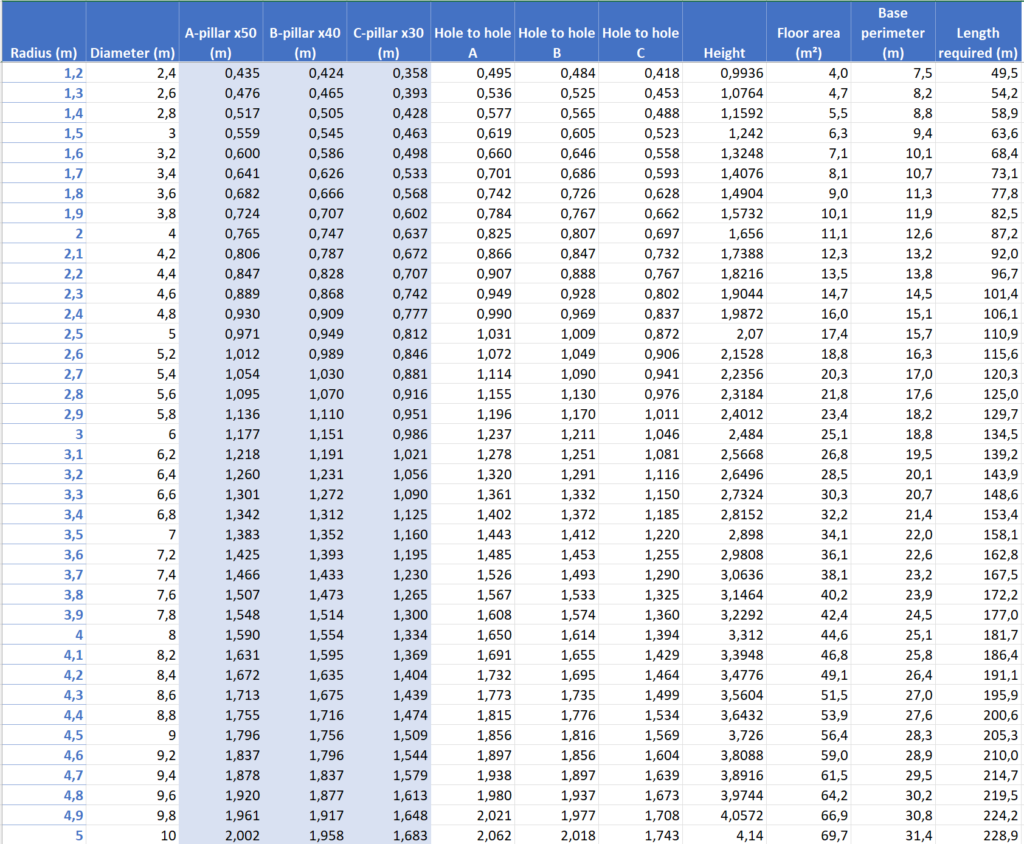
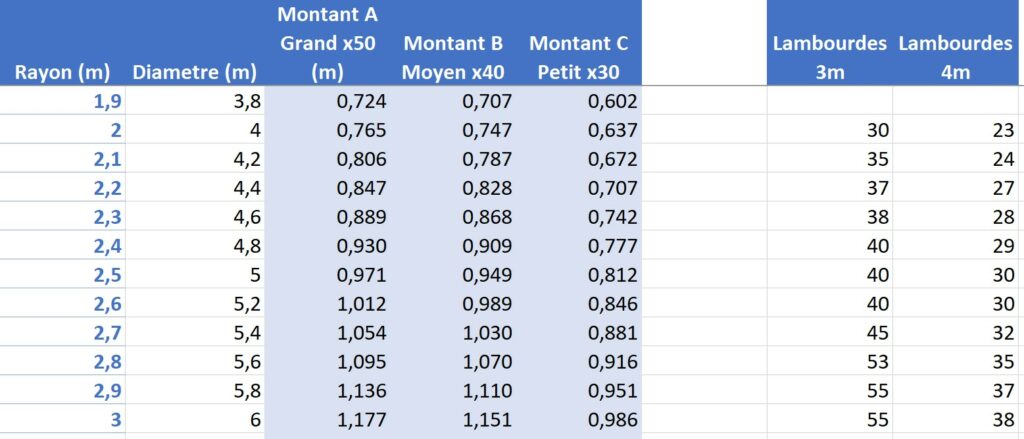
Here is a table showing the possible dome sizes:
Explanations:
For a geodesic dome with a 3m radius (6m diameter) I have to cut out:
- 50 A-pillars (large) measuring 1.177m
- 40 B-pillars (medium) measuring 1.151m
- 30 C-pillars (small) measuring 0.986m
NB: If you use another geodesic dome calculator, remember that these calculators often give you the measurements from “hole to hole”, i.e. the centre of the connector. However, there is 3 cm between the centre of the connector and the start of the connector leg. That’s why the 2 “hole to hole” columns are 6cm longer. But you must cut to the length of the 3 columns A, B and C.
Note: the geodesic dome I’m building in the video is 335cm in radius, or 6.70m in diameter.
Optimise wood cutting and purchasing
Did you know that you need exactly the same number of 3-metre joists to build a geodesic dome with a diameter of 4.8 m as you do for one with a diameter of 5.2 m? This is because you’ll have more falls on the smaller dome.
For example, here’s the number of 3m or 4m joists you’ll need for the dome:
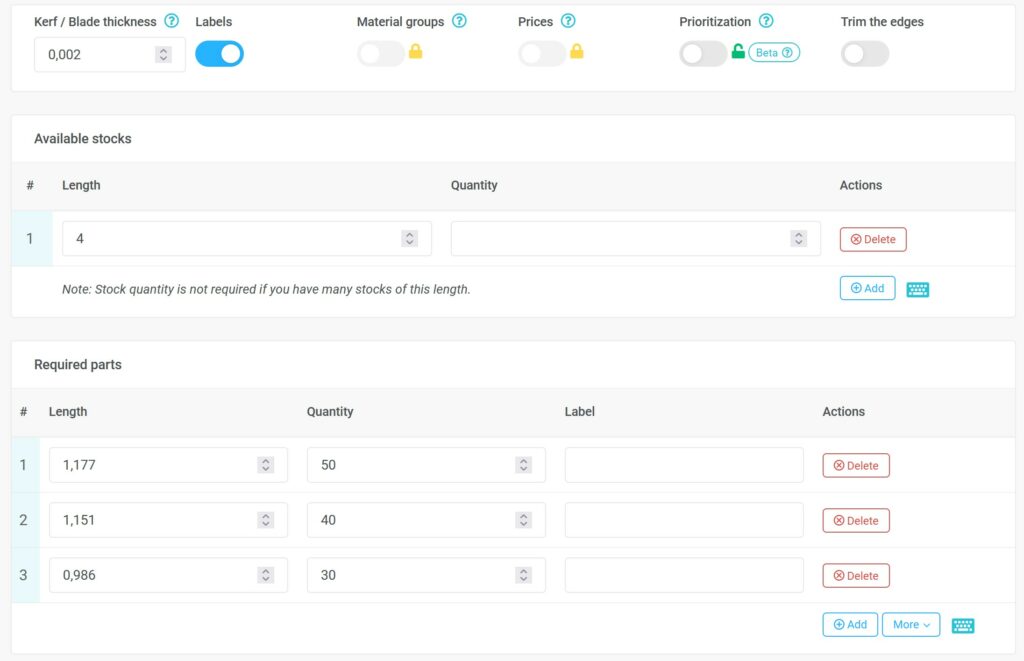
I recommend this free internet application to optimise your choice of wood to buy and cut: Optimcutter
Here are the parameters, for example, for a 6m diameter dome, a 2mm board and 4m joists:
What does the 3/8 in 3/8 frequency 3 mean?
Frequency 3 geodesic domes come in 2 formats: 3/8 and 5/8 (sometimes also called 4/9 and 5/9). This is the division of the sphere:
- 3/8: a little less than half the sphere
- 5/8: a little more than half the sphere. These domes are one level higher than the 3/8 domes.
What wood should I use for the struts of a geodesic dome?
I recommend using construction or decking timber that offers good strength at a fair price.
The MINIMUM length and width of the struts should be 30mm to ensure the stability of the structure.
Decking joists are very attractive, with dimensions of around 62x38mm or 70x45mm. The joists are also often treated to class 3 or class 4, giving this wood very good resistance to rain.
Construction rafters / half-rafters (on the websites of major building retailers, type in “construction timber”) are often even cheaper and thicker with dimensions of 75×50, but their treatment and rain resistance is often inferior (generally class 2 – this is yellow-coloured wood)
TIP: choose your own wood in the large building stores. Check that the wood is not twisted or warped. Twisted joists will make assembling your geodesic dome much more difficult!
TIP: If you plan to treat the wood, I advise you to do so after cutting the wood but before assembling it: it will be easier to paint/spray the wood flat than once the geodesic dome has been assembled.
TIP: buy a few extra large struts: they will be needed to support the high levels of the dome during construction.
My experience of assembling the domestar V3
A frequency 3 dome is more difficult to assemble than my domestar V1 and domestar V2: there are many more parts to assemble and more struts are levered and therefore require supports during assembly. Here are my recommendations:
- 1st floor: absolutely provide a support until the belt is fitted
- 2nd floor and above to be done by 2 people. Provide supports
- From the 2nd stage onwards, the connectors start to bend during assembly under the strain. But don’t worry: once everything is assembled, the connectors will return to “normal”
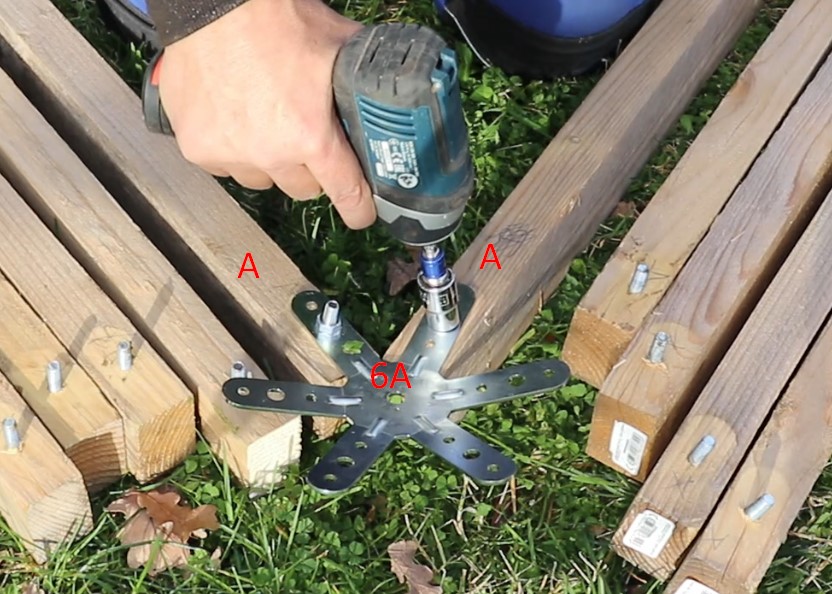
- Be sure to mark the letters on the struts (A, B and C): it’s very easy to get the wrong strut. Take the time to check.
Preparing to build the geodesic dome
During this preparation phase we will:
- Cut out the struts
- Drill all the struts
- Insert all the screws
Prepare the location for the geodesic dome
Once you have determined the diameter of the geodesic dome using the table above, make sure that you have enough space for your dome and that this space is flat enough.
IMPORTANT: this 3V 3/8 frequency geodesic dome is NOT flat: the base is not flat. If you absolutely need a flat base, then it is better to start with a 2V dome. There is a Krushke method for building a flat 3V 3/8 dome but these Domestar connectors don’t allow it.
Cutting the struts
You’re going to cut:
- 50 large A-pillars
- 40 medium B-pillars
- 30 small C-pillars
Start by cutting out the first strut and checking that its length corresponds exactly to what you wanted.
Use this first strut as a template: trace the cutting line on the wood to be cut using this strut. Remember to cut just after the cutting line, not on the cutting line, to allow for the thickness of the blade.
Drill the struts
Now you need to drill the struts to accommodate the bolts. Here again, great precision will help you during assembly.
The bolt hole should be 40mm from the end of the strut.
You need to drill through the LONG side of the strut to ensure maximum stability for the dome.
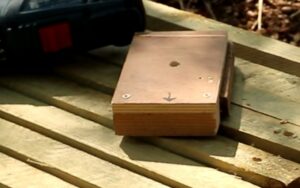
Create a drilling pattern for greater precision
I strongly recommend that you create a drilling template.

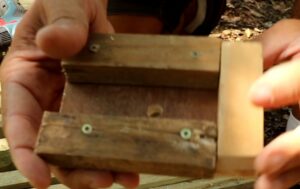
That’s it, your pattern is ready.
Now finish the holes in the struts, using your template and trying to drill as straight as possible.
Mark the side where you put the drill bit in: this is the side that will be placed against the connectors, as it is the most accurate side.
Insert the 240 bolts into the holes. Pay particular attention to the direction of insertion: insert the bolts through the OUTLET of your drill bit. This way, the end of the bolt is on the same side as the entrance to your drill bit and it’s this side that will be against the connector.
Use the hammer to ensure that the square part of the countersunk square bolts penetrates the wood.

Tip: if the hammer isn’t enough, you can use a screw and washer and tighten the bolt so that it goes into the wood.
Presentation of connectors
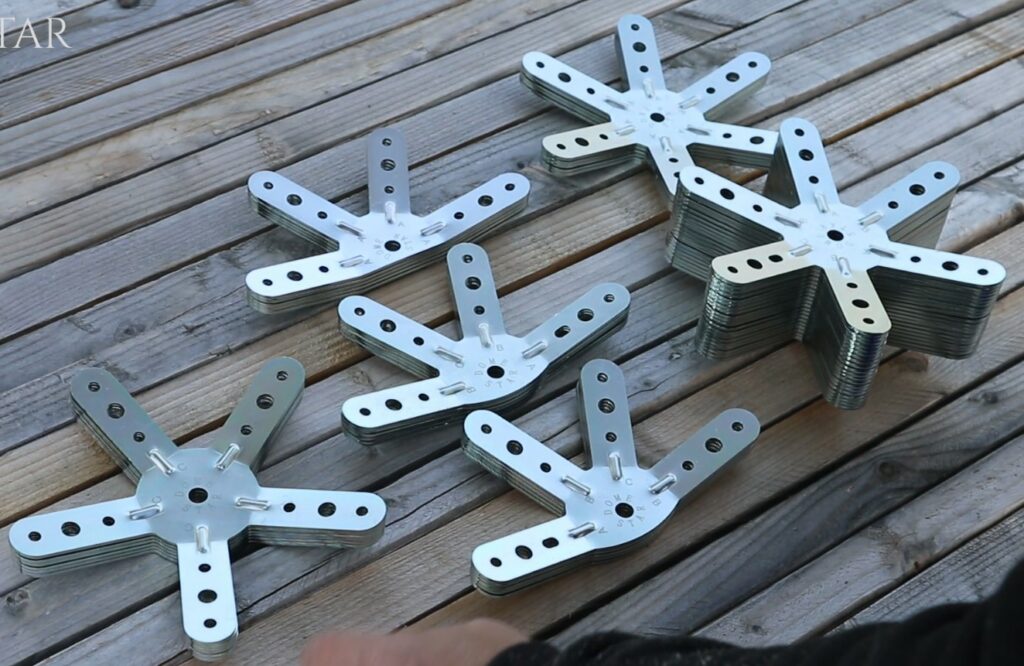
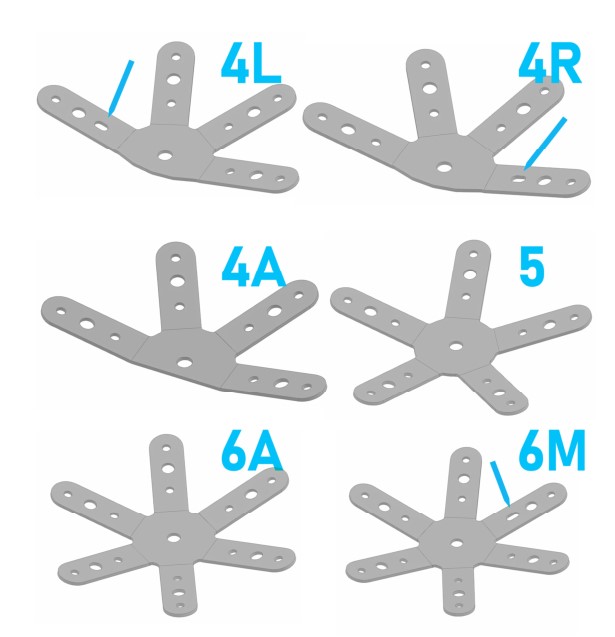
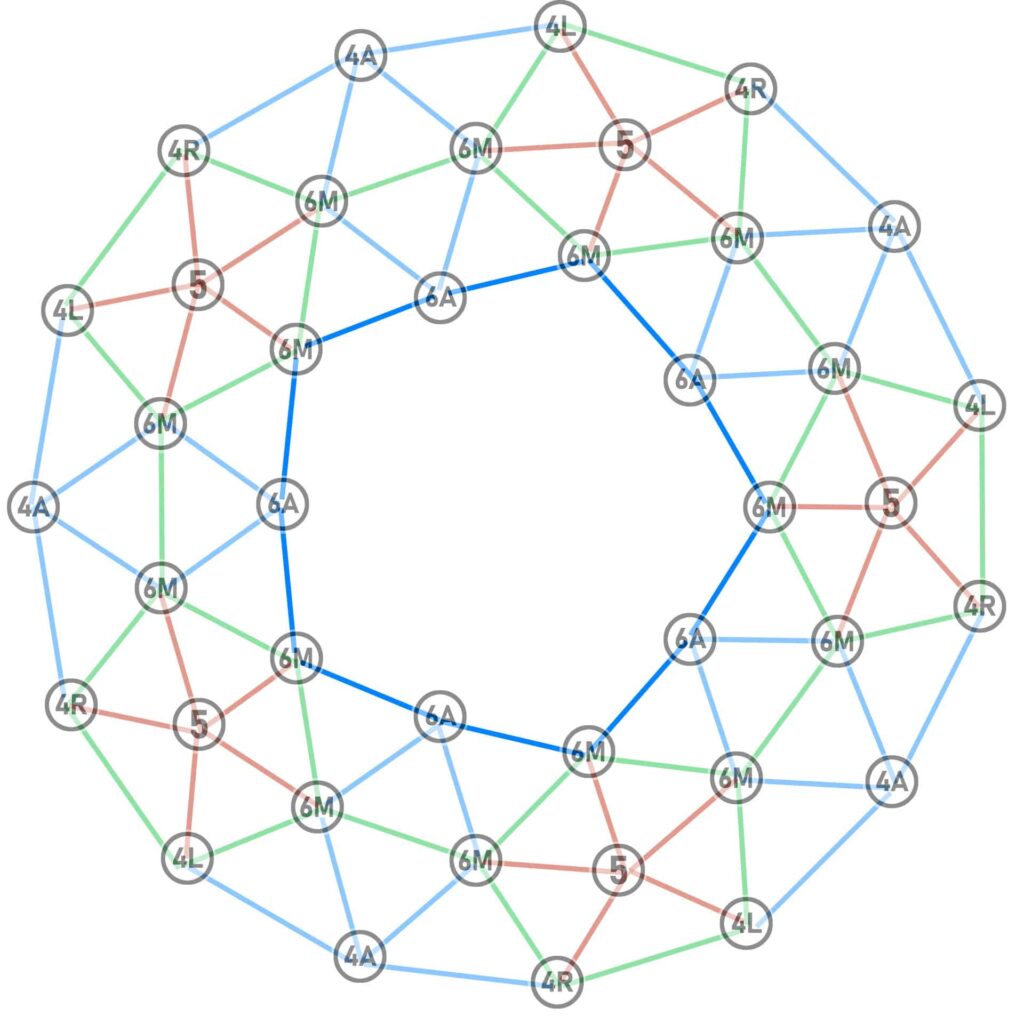
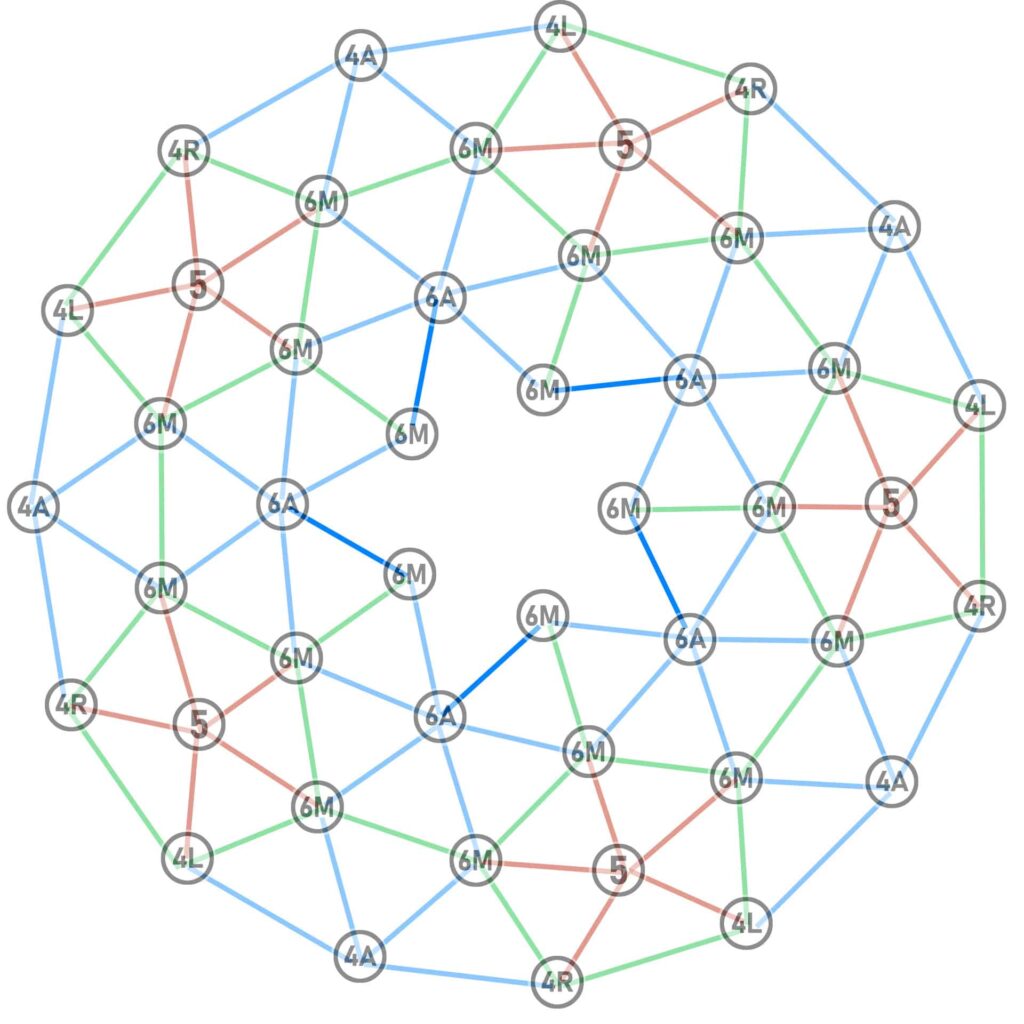
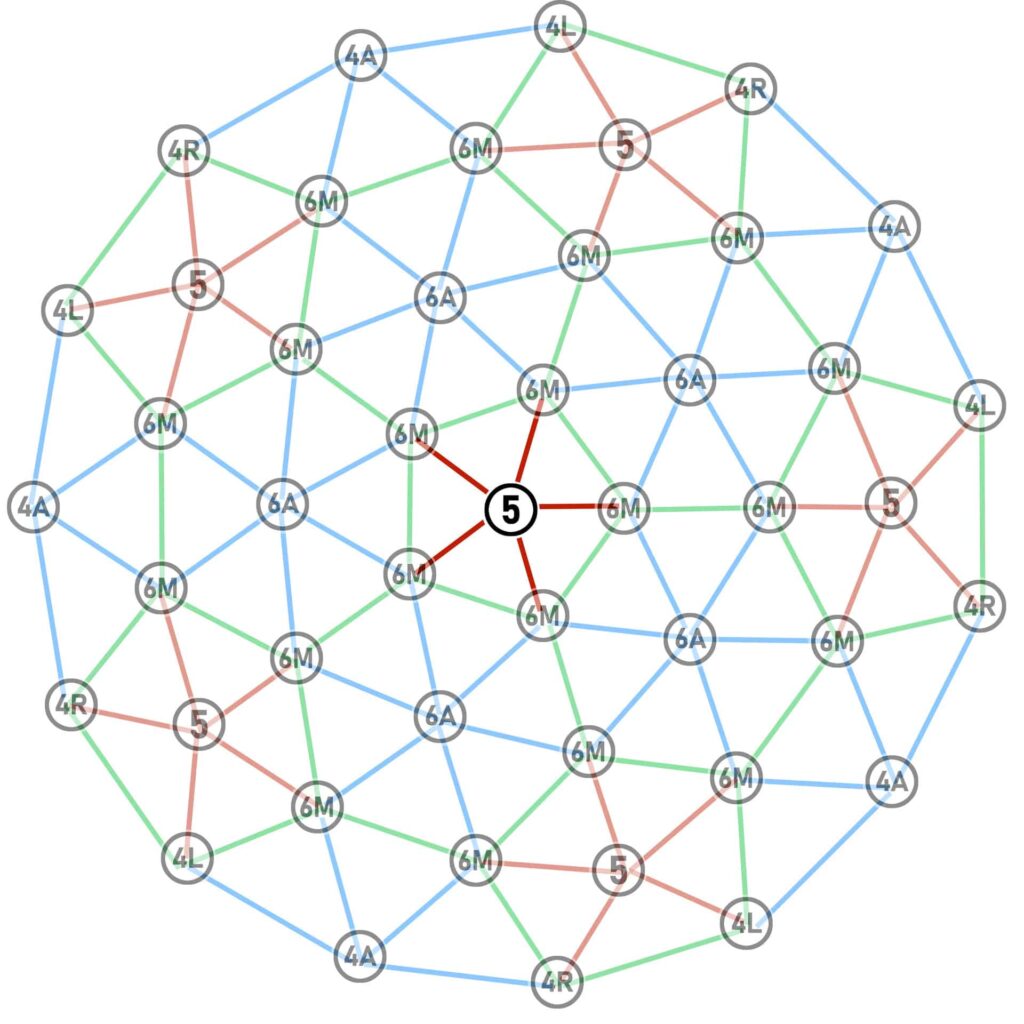
In your Domestar pack you’ll find 4, 5 and 6-leg connectors.
I advise you to start by sorting your connectors:
WARNING: there are:
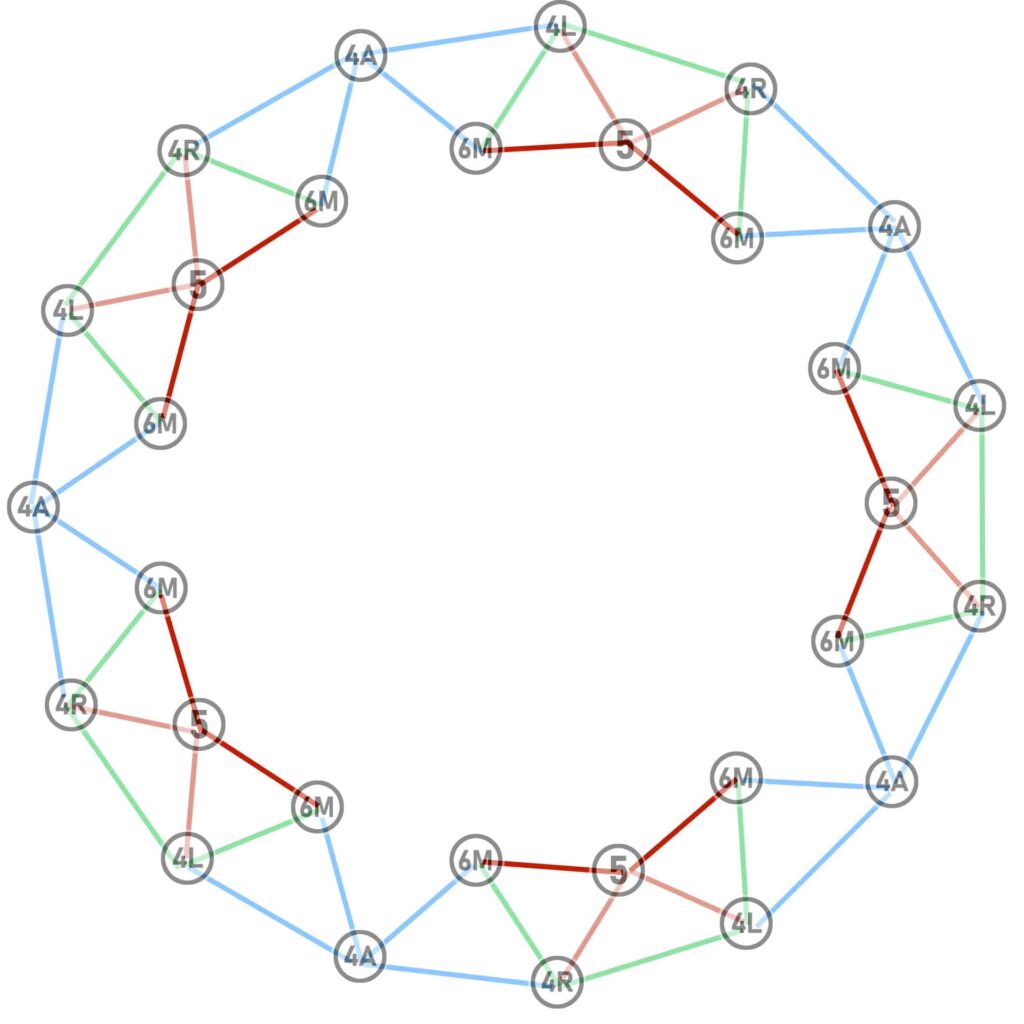
- 3 different types of 4-leg connectors
- 2 different types of 6-leg connectors
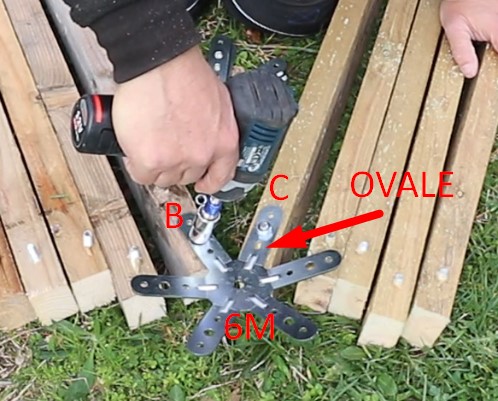
The drawing above shows the distinguishing marks that allow you to tell the difference between the connectors.
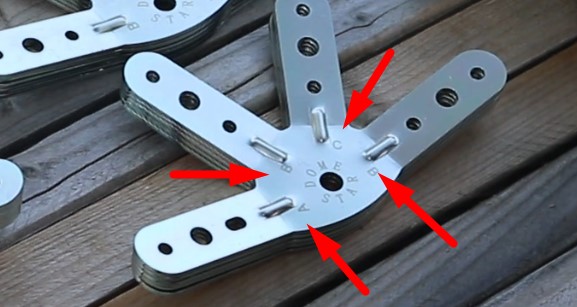
Each leg also has a letter engraved on it so you know whether you need to fit an A, B or C strut:
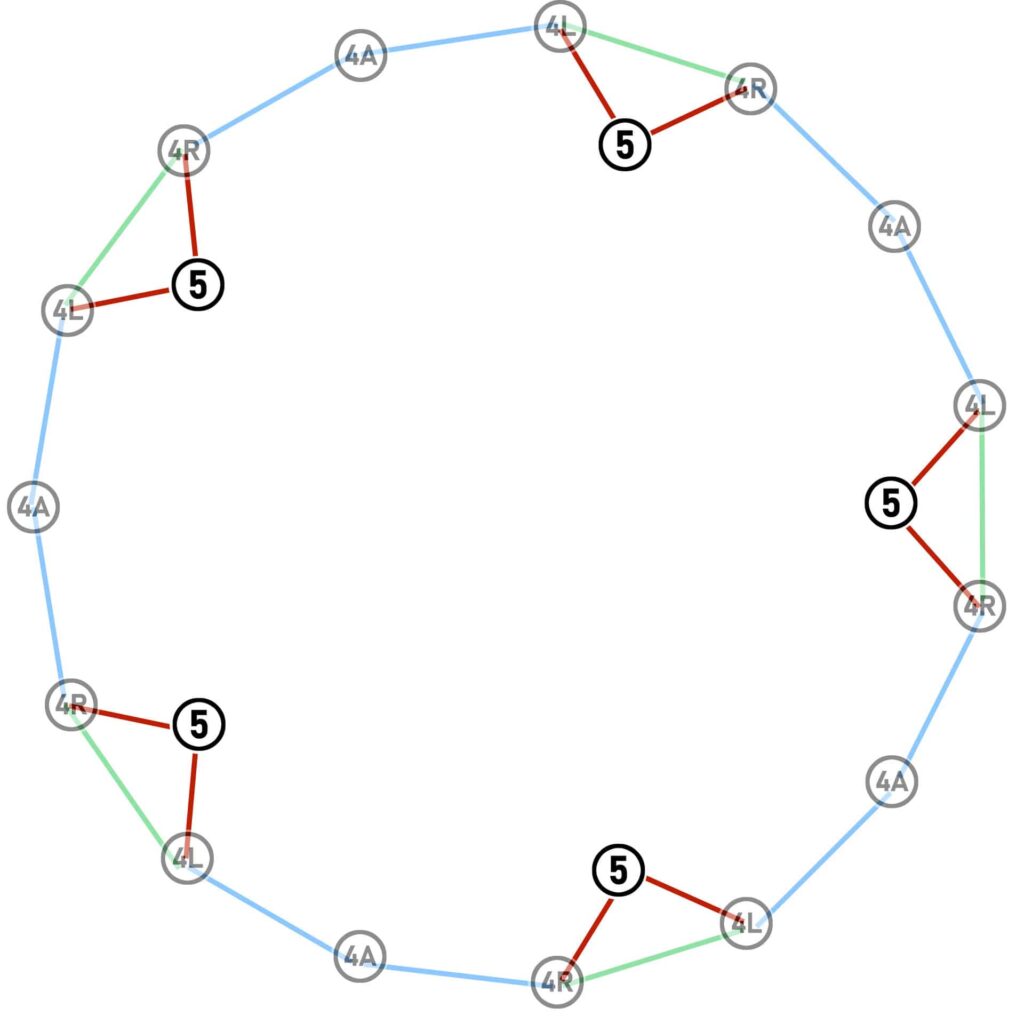
Step 1: the base
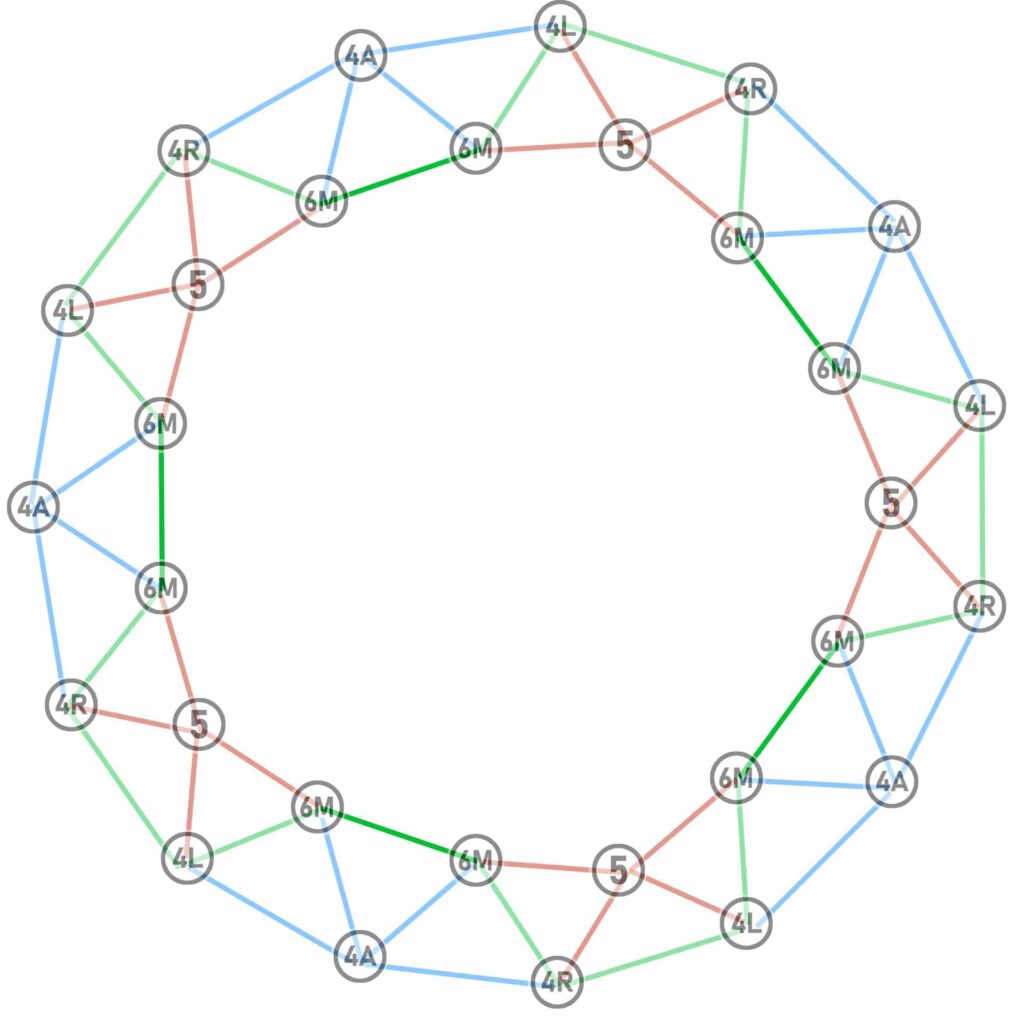
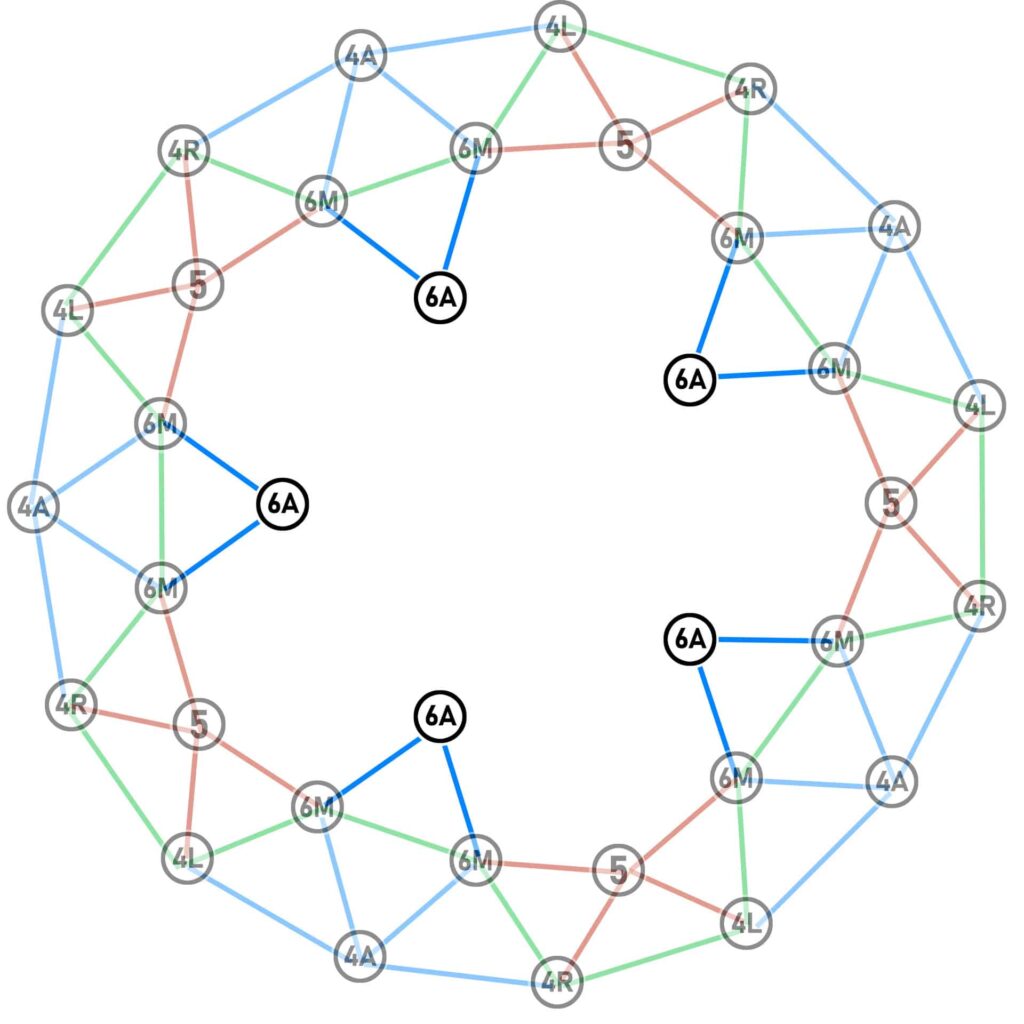
The colour of the lines indicates which amount to use:
- blue: large amount A
- green: medium amount B
- red: small amount C
Parts required:
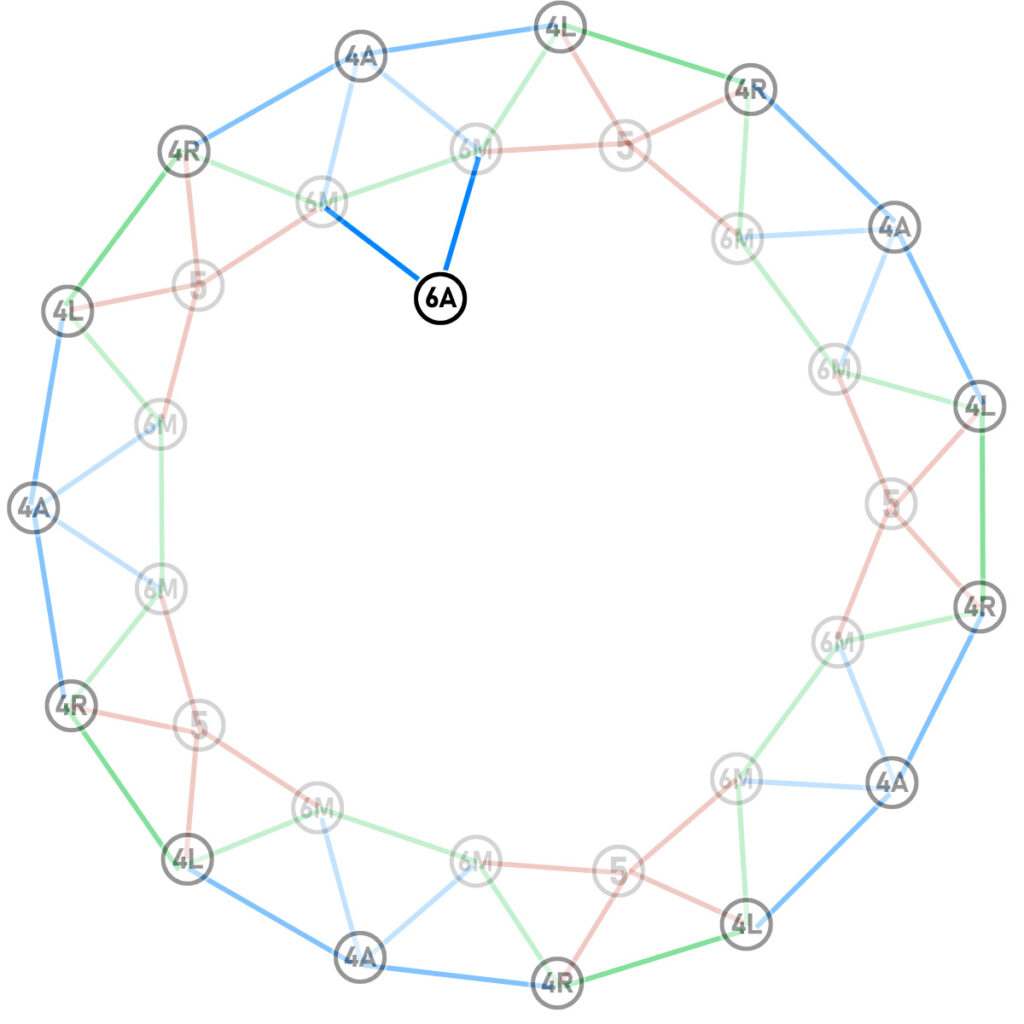
- 5x B (medium), 5x C4L, 5x C4R
- 5x A (large), 5x C4A
Assemble 5 B-pillars with 4R and 4L:
Make sure I only assemble the legs with a B on them.
Continue by assembling 2 large A-pillars with a 4A connector between them. Repeat 5 times:
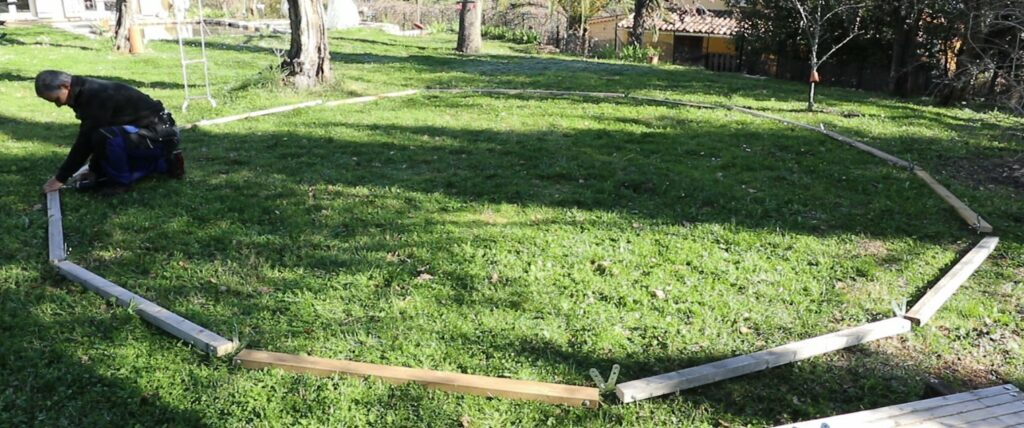
Finally, assemble the base to the floor, alternating our two types of struts.
The one with the two connectors and then the double one with the 4A in the middle.
Step 2: First level
Step 2A: the 5 triangles with the small struts
Parts required:
- 10x C (Small),
- 5x C5
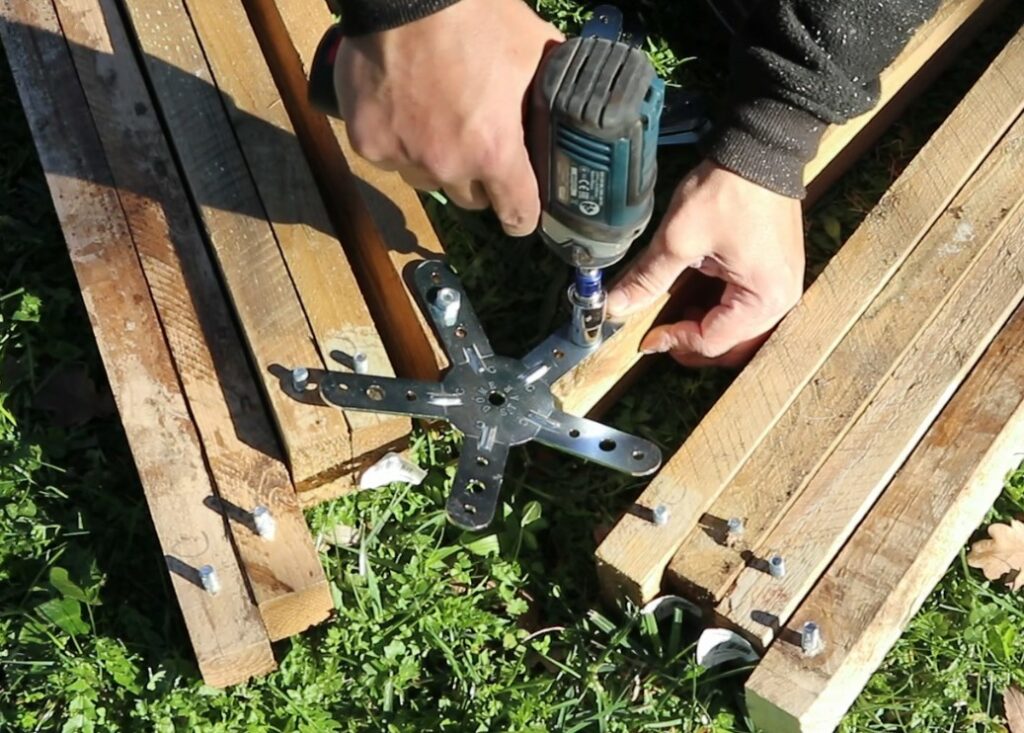
Take 10 small C-pillars and 5 5-pin connectors. Screw these connectors to 2 struts.
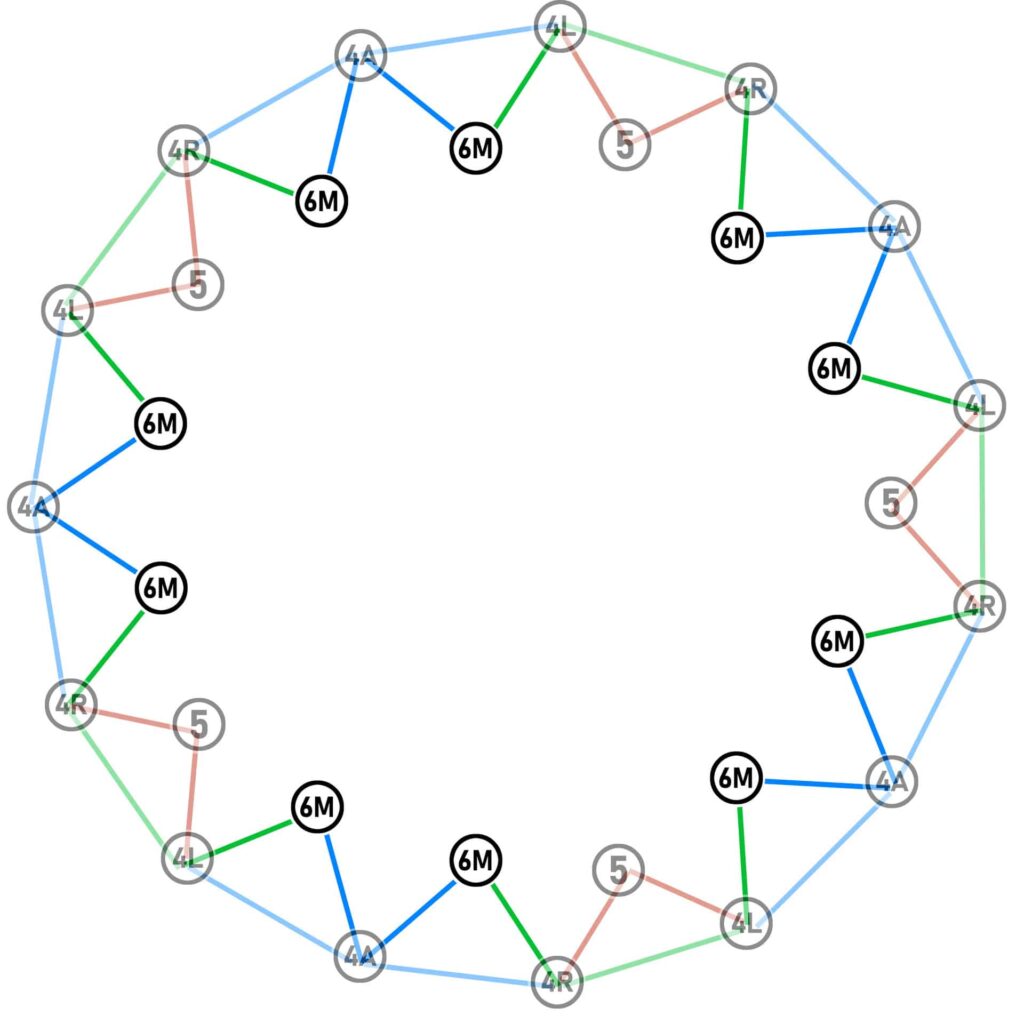
STEP 2b: First level 5 triangles with the 6M
Parts needed:
- 5x A (Large),
- 5x B (Medium)
- 5x C6M
Be careful, this is the first moment when it’s quite easy to make a mistake if you’re not careful.
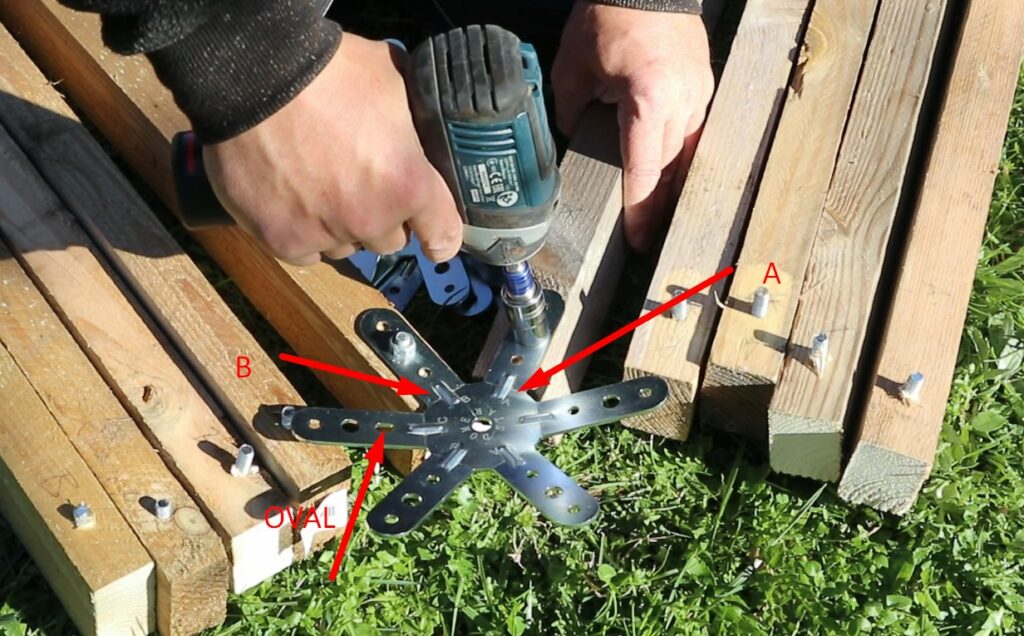
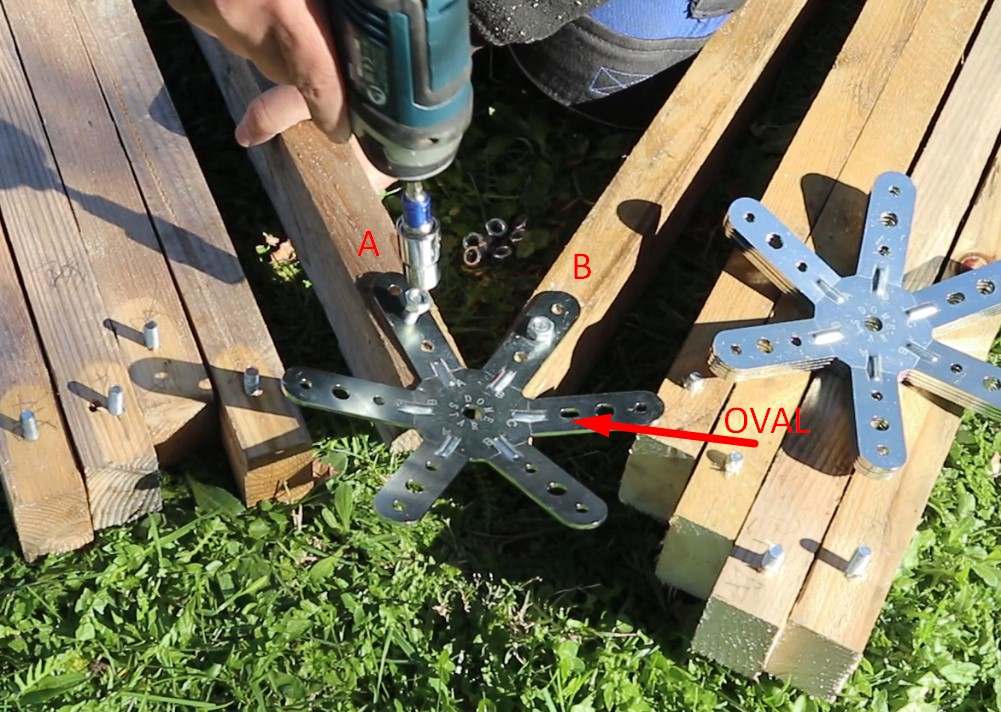
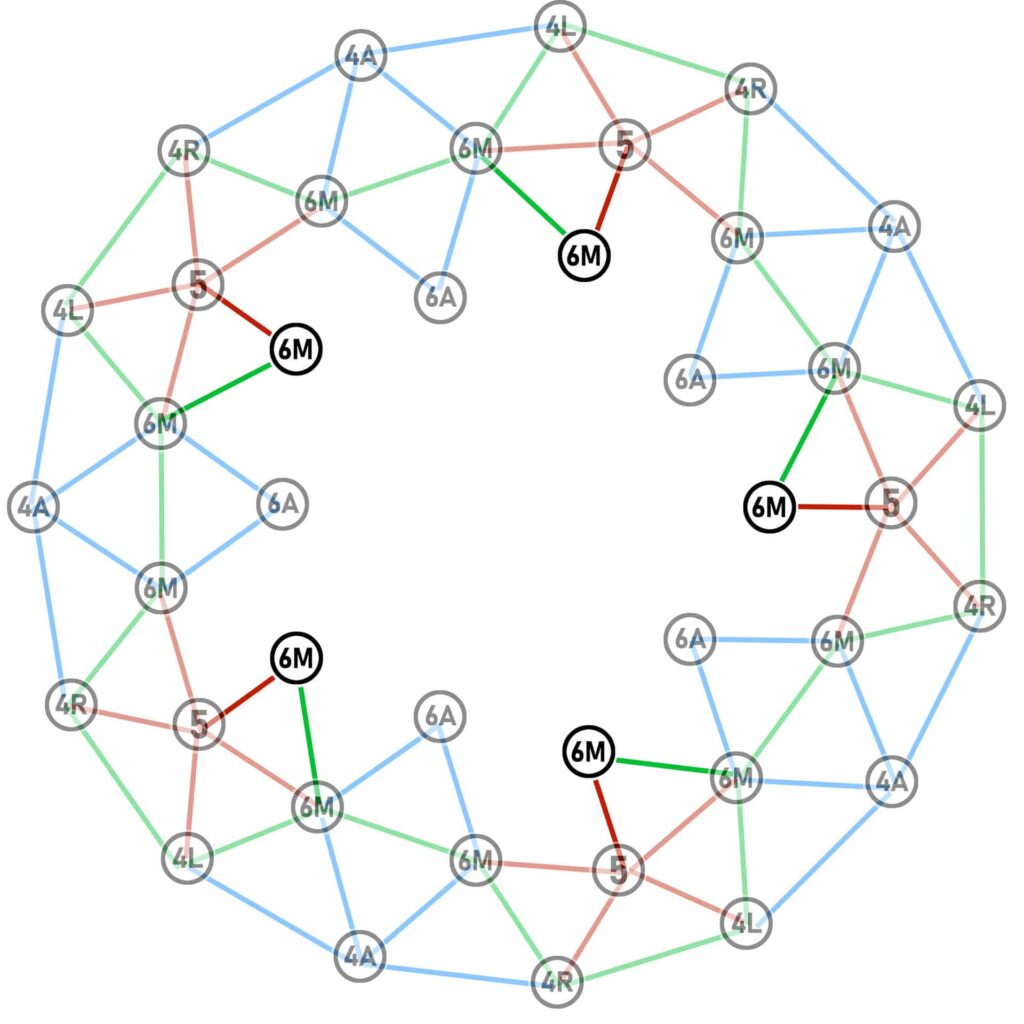
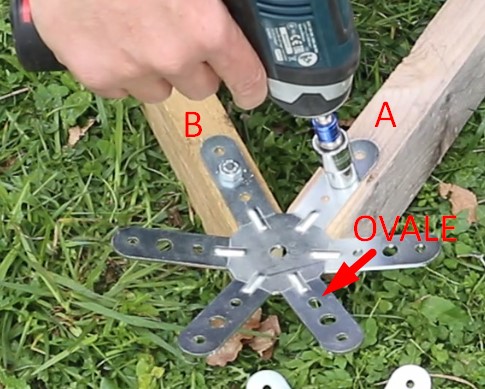
For the first 5 triangles, put the B-pillars to your right and the A-pillars to your left.
The 6M connector should have the oval on your right.
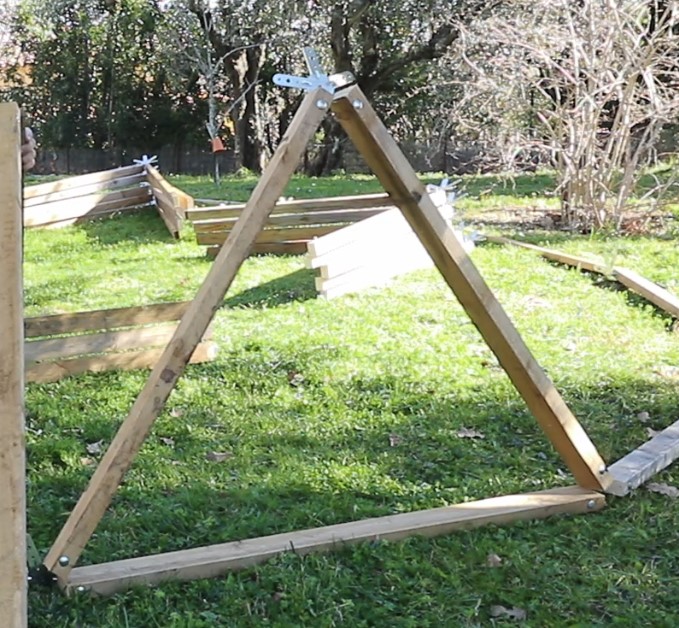
Assemble 5 triangles.
STEP 2c: First level 5 last triangles with the 6M
Parts needed (= same as above):
- 5x A (Large),
- 5x B (Medium)
- 5x C6M
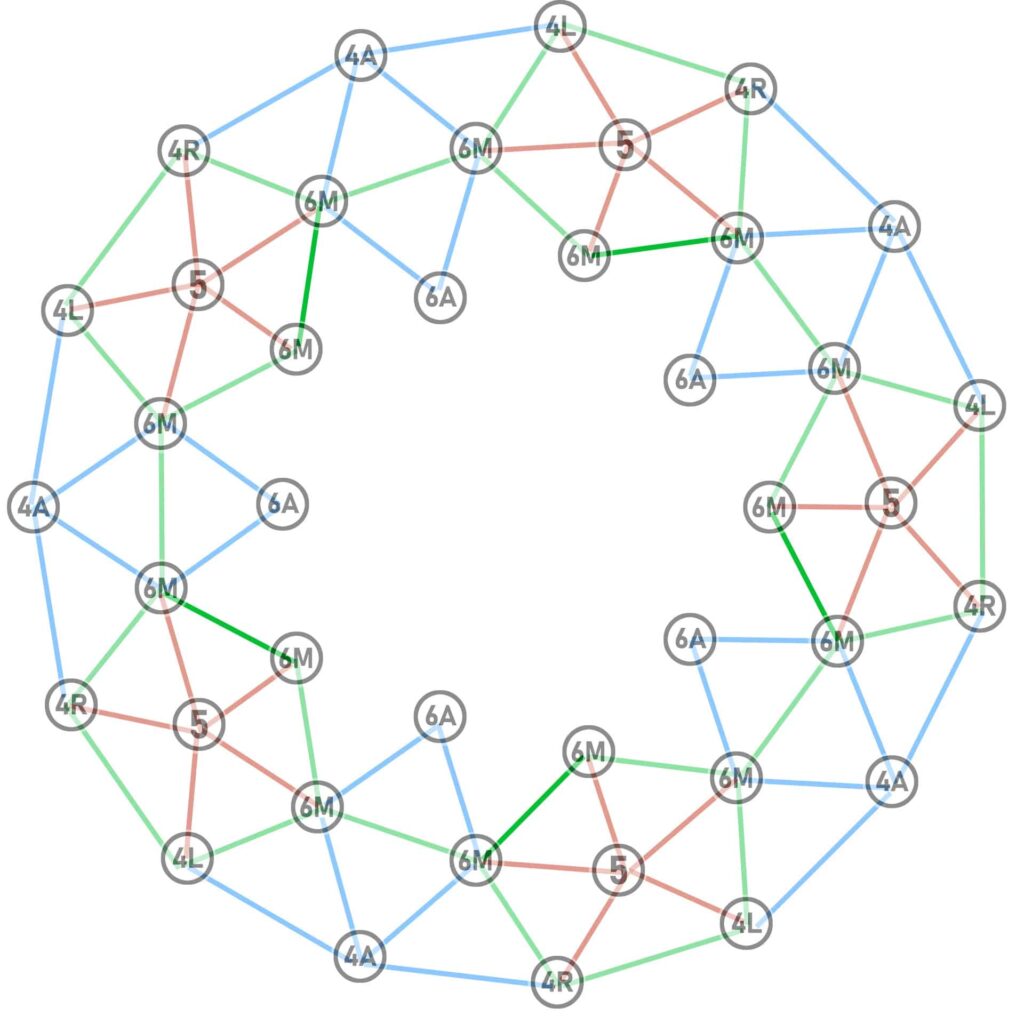
This is the opposite of step 2B: you now have the A’s on your right and the B’s and oval on your left.
For the first 5 triangles, you need to put the B struts on your right and the A struts on your left.
The 6M connector should have the oval on your right.
Assemble 5 triangles.
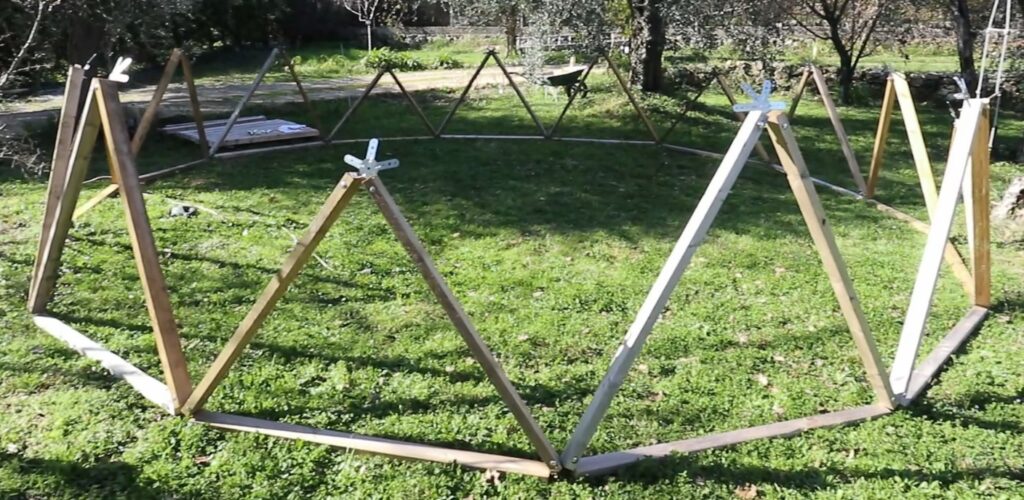
Step 2d: assemble the triangles on the base
First attach the triangles with the C5s between the 4Ls and 4Rs: 4R and 4L are easy to recognise because they are the only ones with ovals.
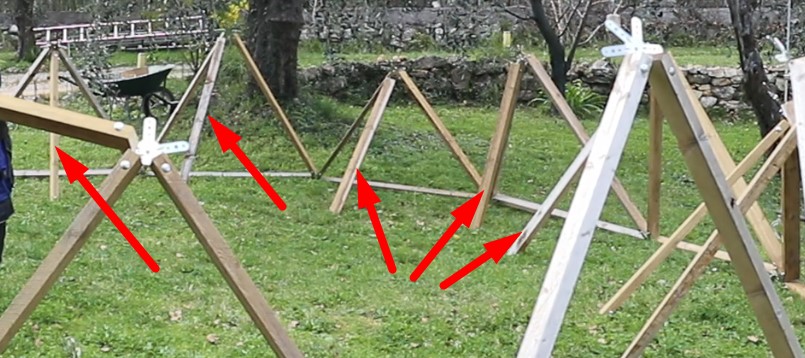
IMPORTANT: I advise you to add a support on these triangles as long as the belt is not installed. Use temporary struts to support these triangles.
Finally, attach the other 10 triangles, taking VERY careful note of the lettering on the connector legs.
Once again, it’s important to support these triangles until the belt is assembled using other temporary struts:
STEP 3: First level belt
Materials required:
- 10x C (Small),
- 5x B (Medium)
The small C posts go on either side of the 5-pin connectors as shown above.
Finally, the medium B-pillars complete the belt: they are always between 2 6M 6-leg connectors.
Once the belt is in place, you can remove the temporary supports you put in at the end of step 2.
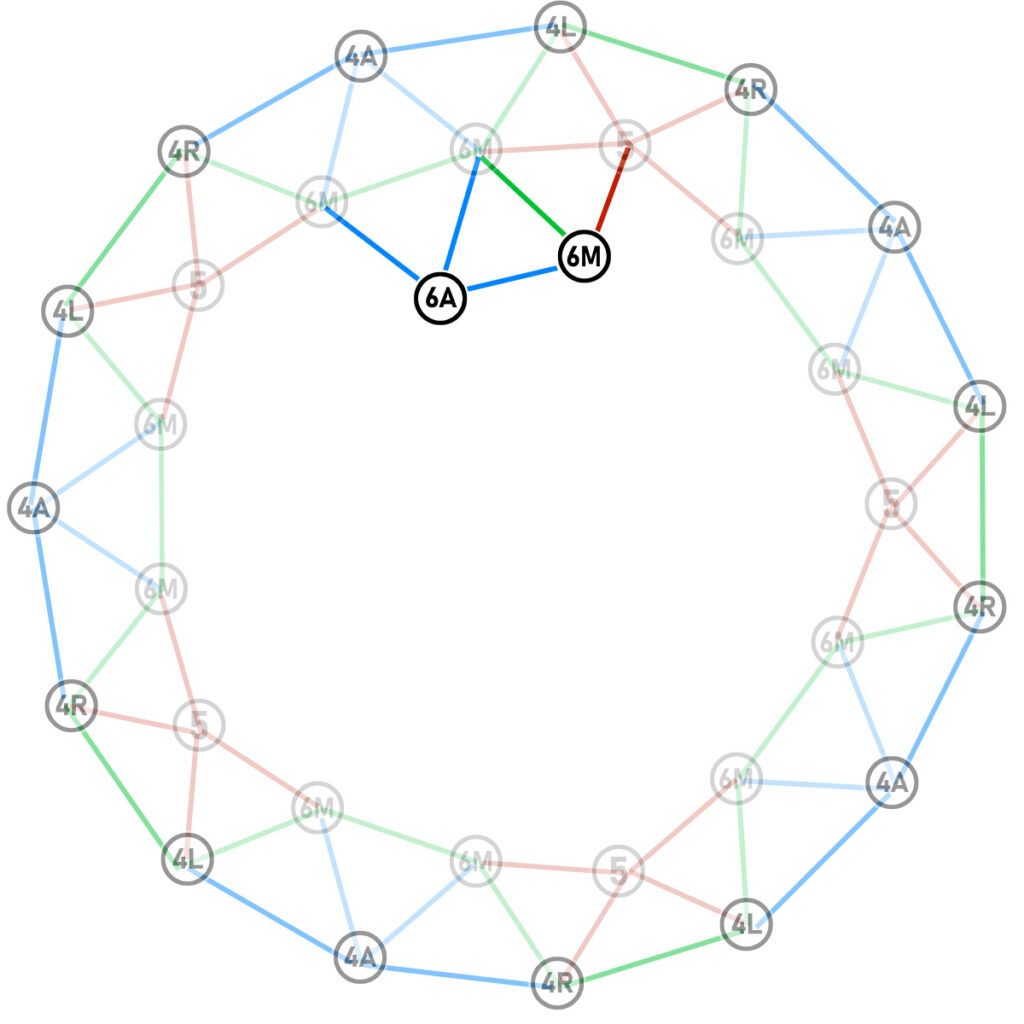
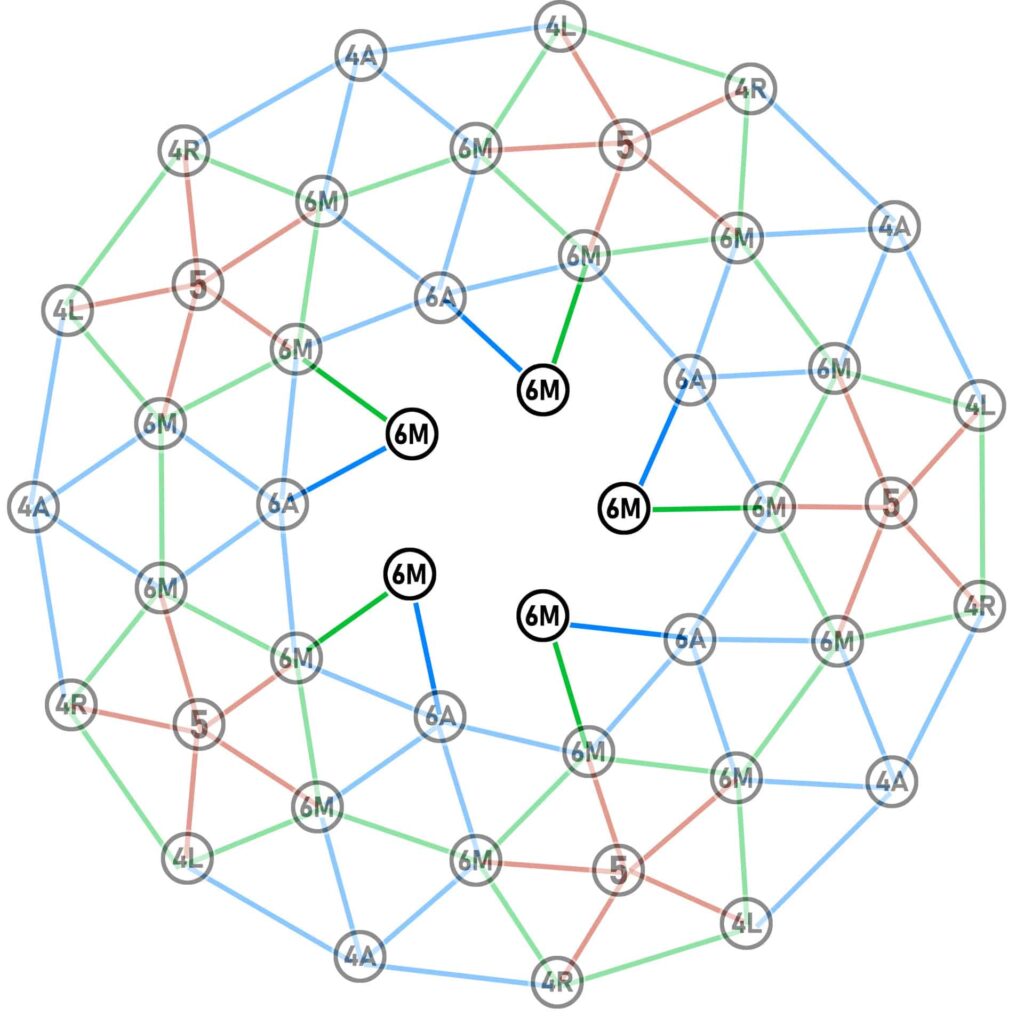
STEP 4A: Second level, the 6A triangles
Materials required:
- 10x A (Large),
- 5x C6A
Start by assembling 5 triangles, each with 2 A-pillars and a C6A.
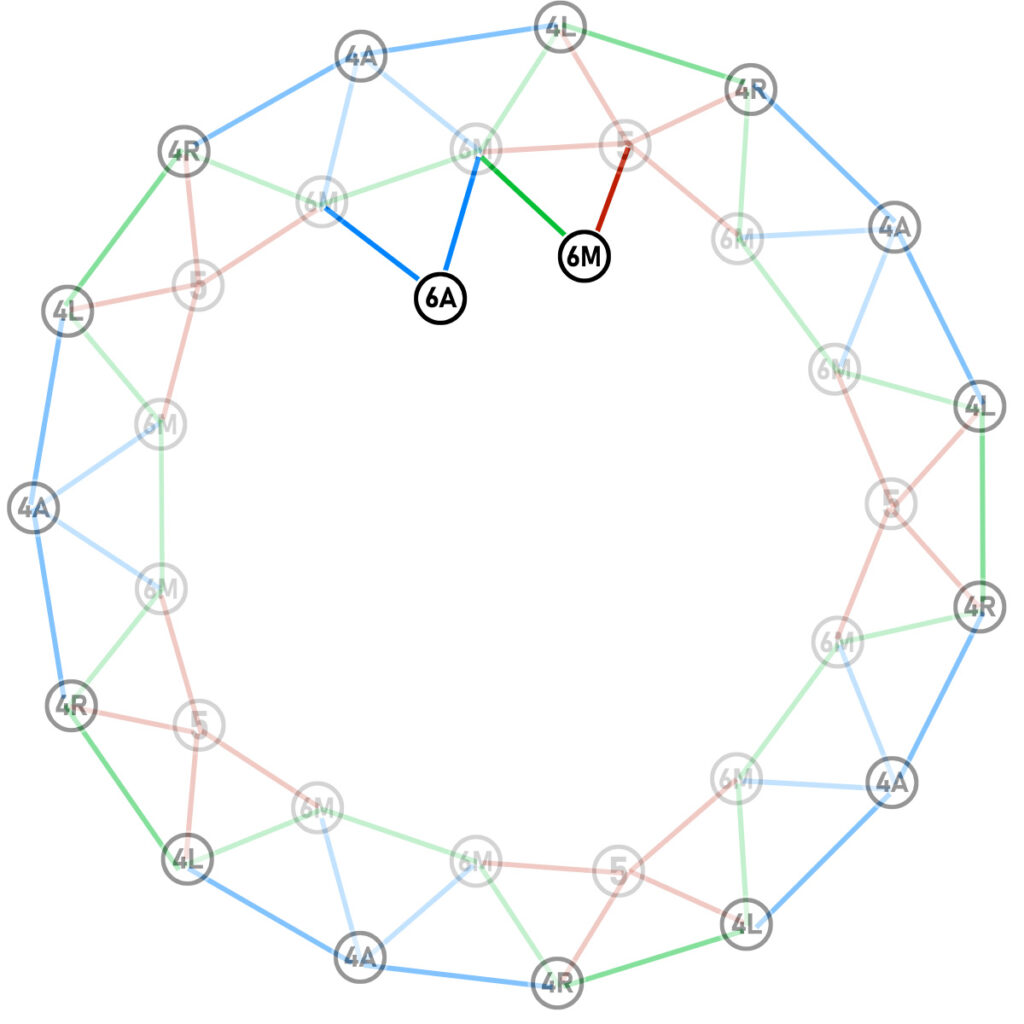
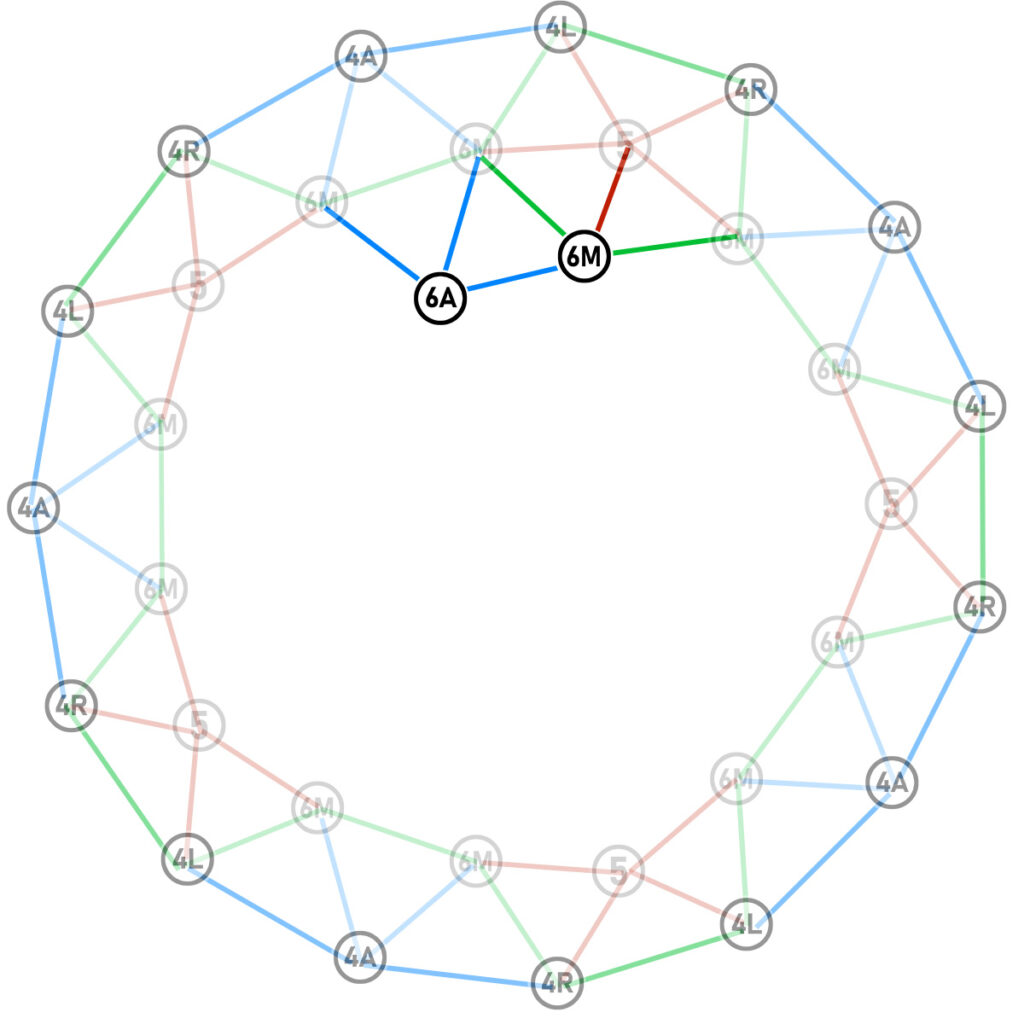
STEP 4B: Second level, 6M triangles
Materials required
- 5x B (Medium),
- 5x C (Small),
- 5x C6M
For these 5 triangles, take care to assemble the B and C struts into the B and C legs as shown in the photo below:
STEP 4C: Second level: installing the 6A triangles
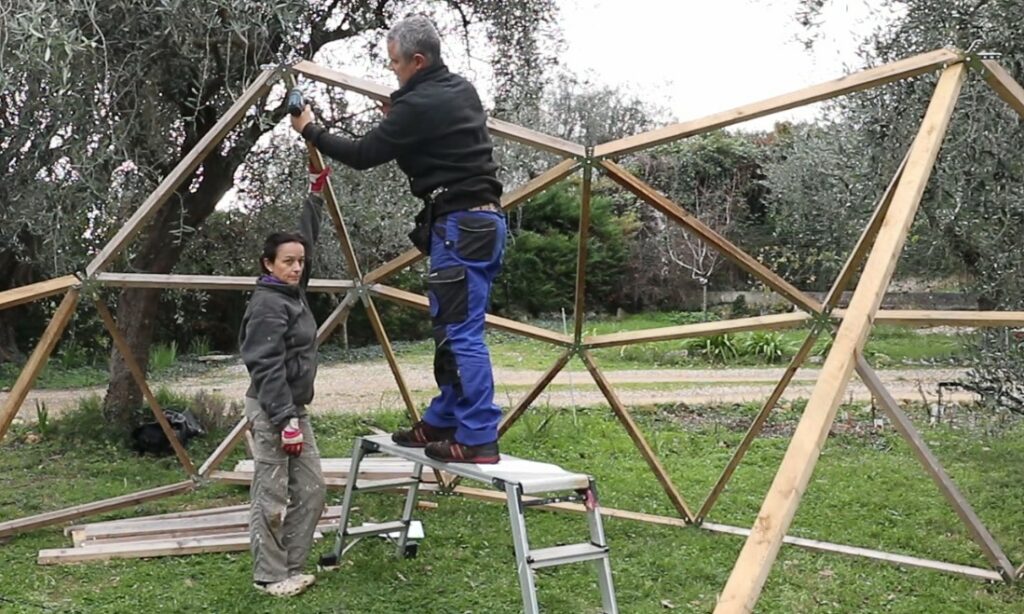
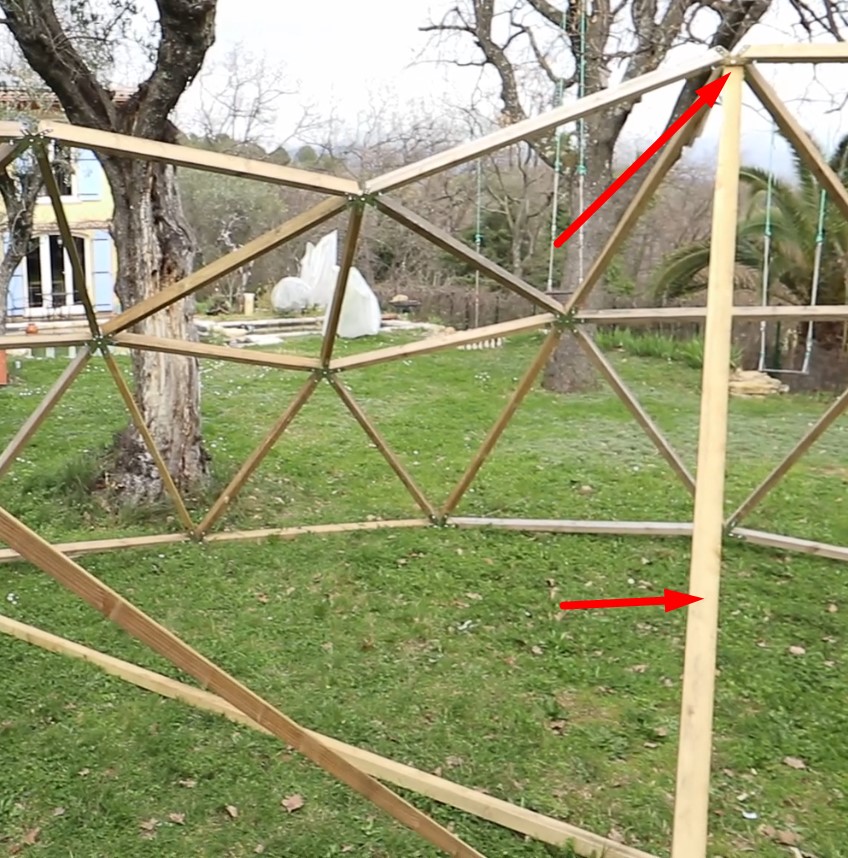
ATTENTION: 2 people are strongly recommended for these steps. I also recommend using supports for these triangles until the second belt is installed. Things get more complicated here, so start this stage in good shape 🙂
I also find it easier to completely finish one part of the dome rather than working by type of triangle as I detail in this guide. I therefore recommend that you:
Install 1 6A triangle ( add a support for this triangle):
install triangle 6M next to it (and add support)
install the large A-pillar (=second level belt) which connects your 2 triangles. Move your support to support this beam.
install the large A-pillar between the 2 C6M connectors
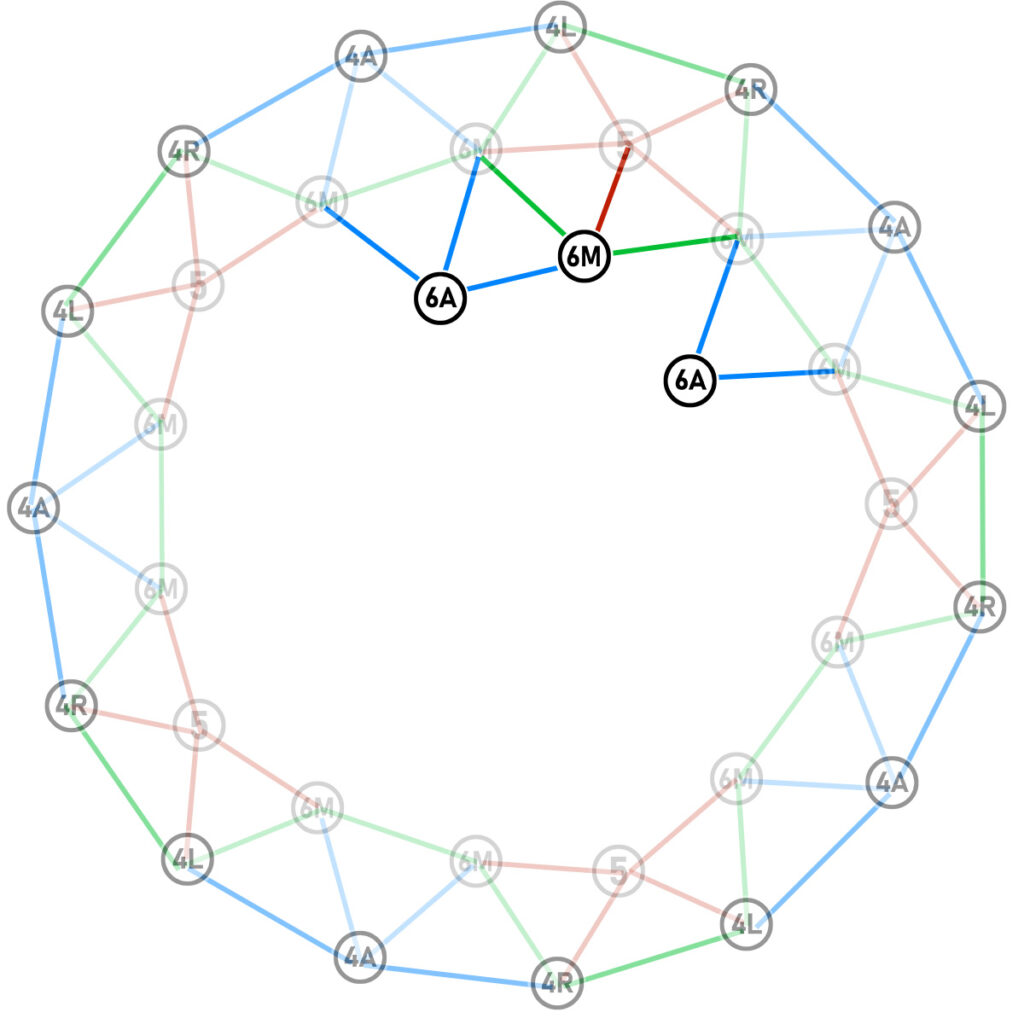
Install and support the next triangle 6A:
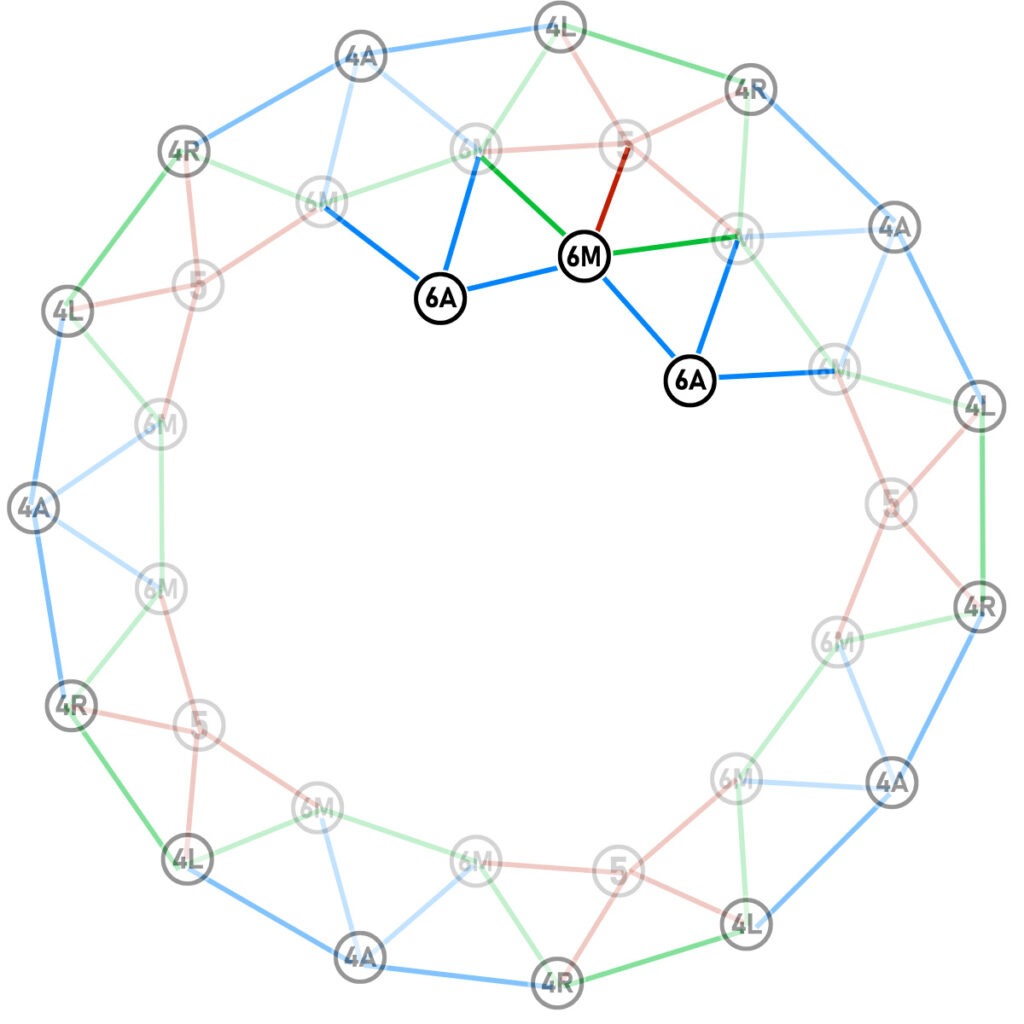
Install a large strut from the second level belt:
Continue the sequence (next: 6M triangle…)
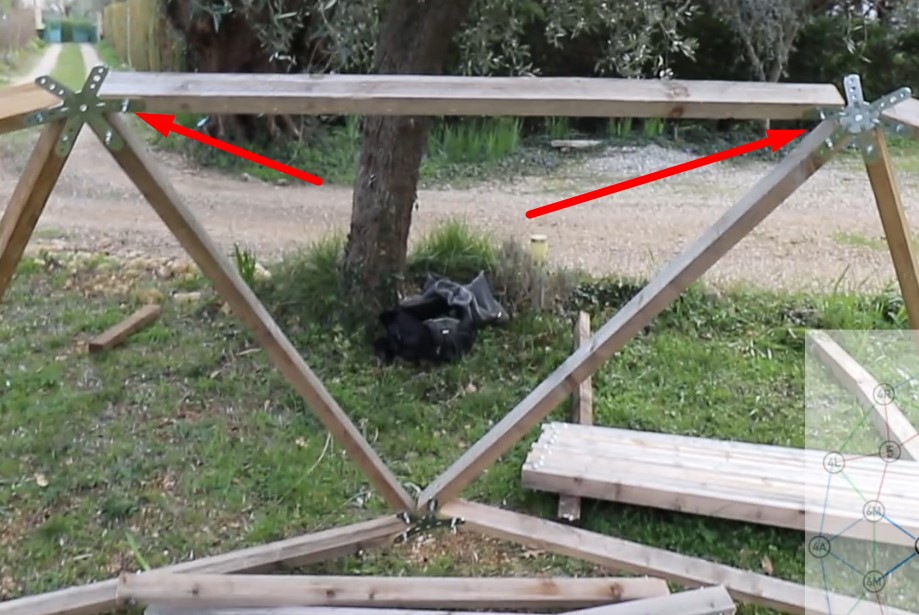
6A triangles are installed on 2 6M connectors. Do NOT try to install them on 5-pin connectors!
The 5 6M triangles fit to the right of your 6A triangles:
The 5x A (large) between the C6Ms
And above all, use studs to support your construction during assembly!
STEP 5: Second belt
I actually recommend doing this step at the same time as step 4, as explained above.
You’ll need
- 10x A (large)
STEP 6a: Third level 6M triangles
Materials required:
- 5x A (large)
- 5x B (medium),
- 5x C6M
Assemble 5 triangles as above.
Before installing these triangles on the geodesic dome, put temporary supports in place:
Install the 6M triangles:
STEP 6b: Third level: the A-pillars
Materials required:
- 5x A (large)
Steps 6a and 6b can be done together: you start with a triangle 6A and then the A strut next to it.
I advise you to continue supporting your construction during assembly with temporary struts:
STEP 7: Third belt
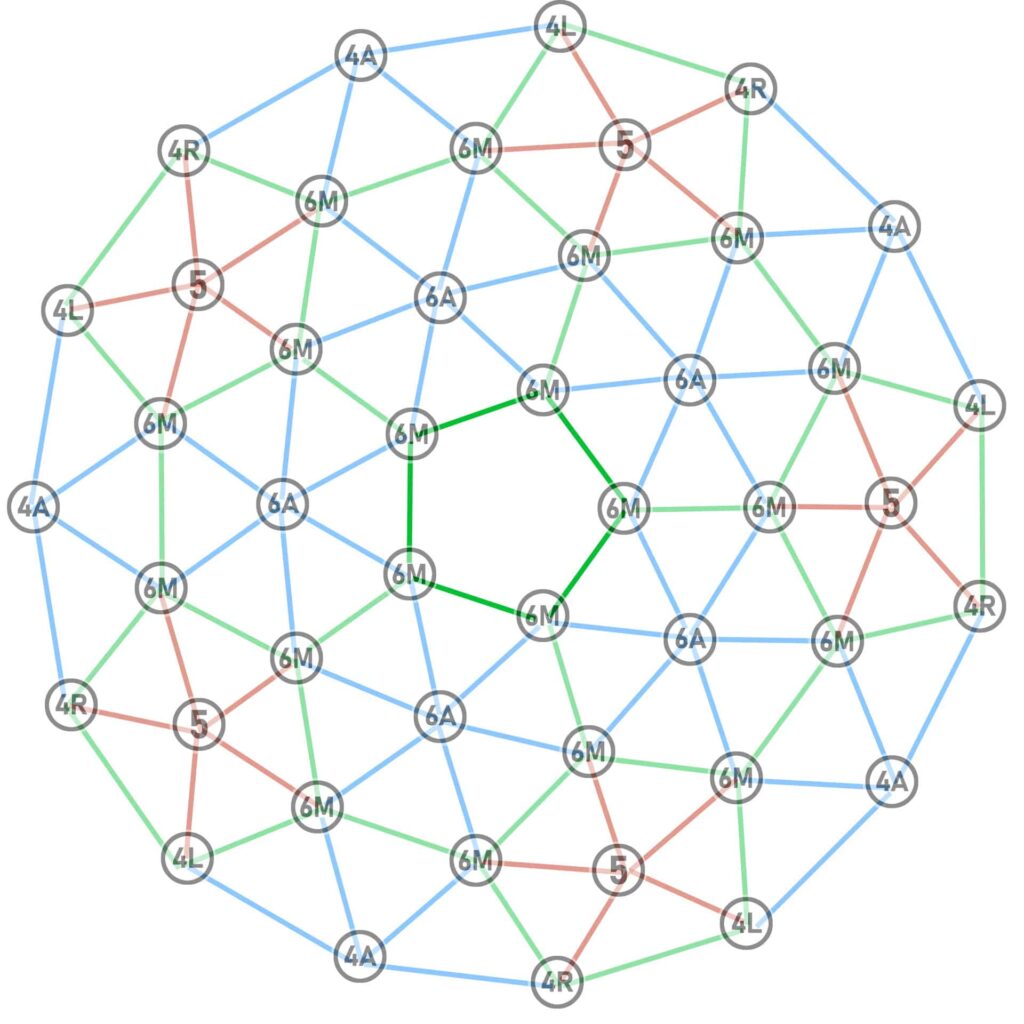
Materials required
- 5x B (medium)
STEP 8: Last pentagon
Materials required:
- 5x C (small),
- 1x C5
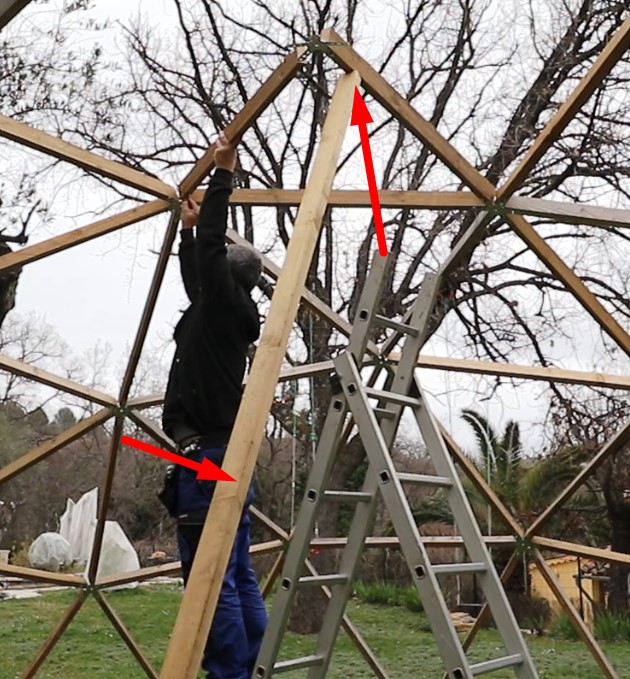
Install the last 5-pin connector on a small strut and install at the very top of the geodesic dome:
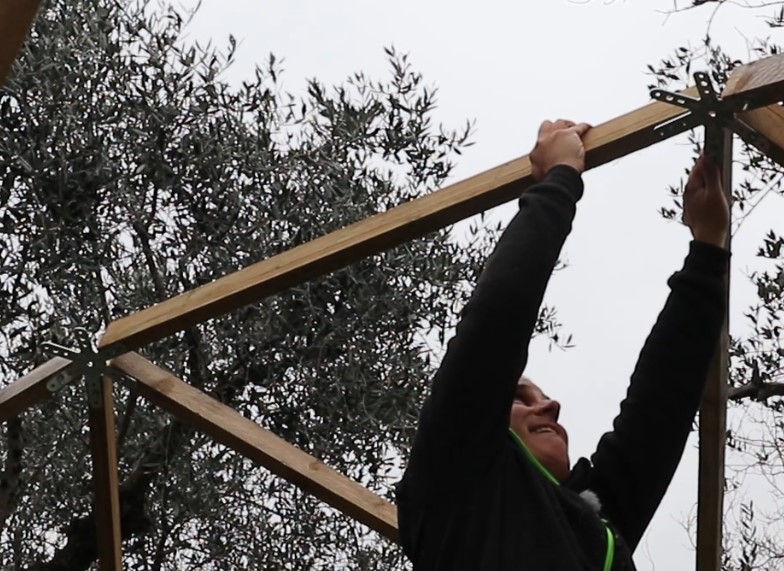
Support the strut during assembly until 3 struts are assembled:
Finishes
Wood screws to prevent slipping
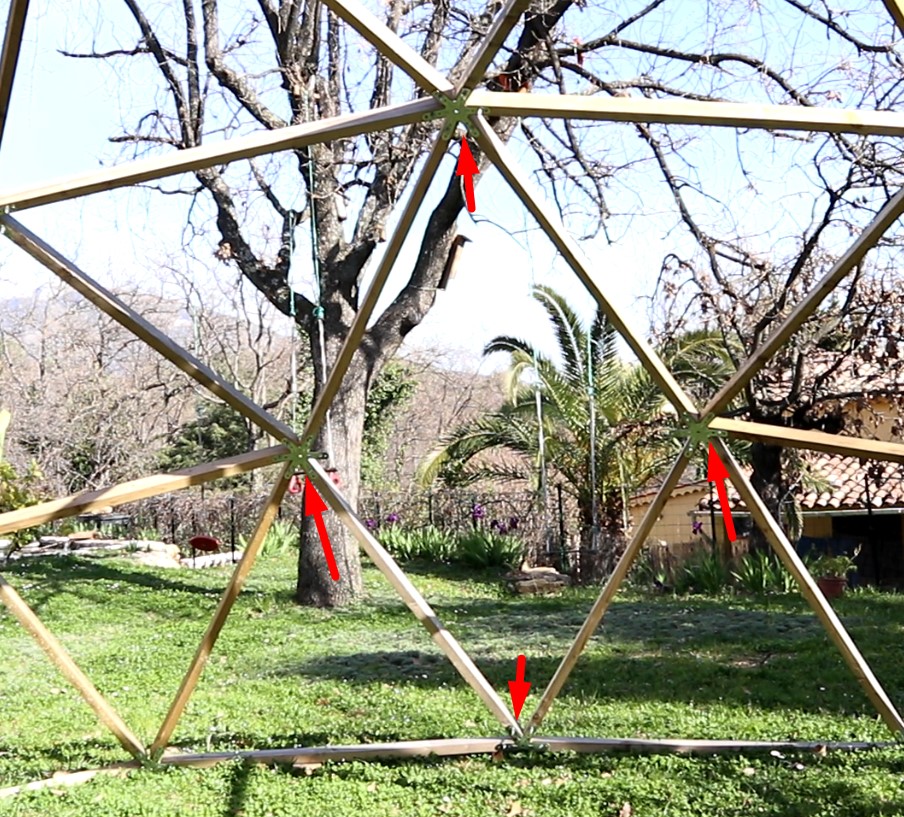
Your bolts are held in place by compression and over time they can unscrew and the connectors will start to turn. To prevent this undesirable rotation, I advise you to add at least 3 wood screws per connector, as follows:
Where can I buy the necessary materials?
If you have any advice to share about buying equipment, drop me a line and I’ll post the best tips here!
Wood
When it comes to wood in France, you can find decent prices without having to negotiate in the big building stores: Castorama, Leroy Merlin, Brico Depot… I find that the professionals are sometimes much more expensive than the building superstores unless you have an account and negotiate for a long time.
Bolts
For bolts I found the best prices in Europe at auprotec(website) with fast delivery and reasonable prices.
TIP: it is often worth buying 100 bolts rather than 50 because of their policy of reduced prices according to quantity.
Direct link to countersunk square bolts
How do I fit a door into a geodesic dome?
I don’t have any experience of dome doors, but I’m sharing on this page my ideas on how I would go about inserting a door into my domes.
However, it’s easy to remove 1 strut from the first belt to leave an easy passage:
In these cases, I advise you to reinforce the structure by adding wood screws in each free hole of the 4 connectors around your new opening.
Remove this amount at the end of construction: not during construction.

