Achetez Domestar en direct sur: / Purchase Domestar directly on: / Compre Domestar directamente en: / Acquista Domestar direttamente su: / Domestar direkt kaufen bei:
DOMESTAR Fréquence 1

![]() Deutsch |
Deutsch | ![]() English |
English | ![]() Espanol |
Espanol | ![]() Français |
Français | ![]() Italiano
Italiano
DOMESTAR Fréquence 2

![]() Deutsch |
Deutsch | ![]() English |
English | ![]() Espanol |
Espanol | ![]() Français |
Français | ![]() Italiano
Italiano
DOMESTAR Fréquence 3 (3/8)
![]() Deutsch |
Deutsch | ![]() English |
English | ![]() Espanol |
Espanol | ![]() Français |
Français | ![]() Italiano
Italiano
DOMESTAR Fréquence 3 (5/8)
![]() Deutsch |
Deutsch | ![]() English |
English | ![]() Espanol |
Espanol | ![]() Français |
Français | ![]() Italiano
Italiano
DOMESTAR Fréquence 3 KRUSCHKE (3/8)
![]() Deutsch |
Deutsch | ![]() English |
English | ![]() Espanol |
Espanol | ![]() Français |
Français | ![]() Italiano
Italiano
DOMESTAR Fréquence 3 KRUSCHKE (5/8)
![]() Deutsch |
Deutsch | ![]() English |
English | ![]() Espanol |
Espanol | ![]() Français |
Français | ![]() Italiano
Italiano
DOMESTAR HEXDOME (5/8)
![]() Deutsch |
Deutsch | ![]() English |
English | ![]() Espanol |
Espanol | ![]() Français |
Français | ![]() Italiano
Italiano
Domestar Fréquence 4 (1/2)
Deutsch | English | Espanol | Français | Italiano
Welcome to the assembly instructions for the geodesic dome using DOMESTAR connectors. If you have any questions, please click on Contact to get in touch with me: I will be happy to help you.
Save / Print this page as PDF:

Materials needed
11 DOMESTAR connectors
25 wooden posts of the same size
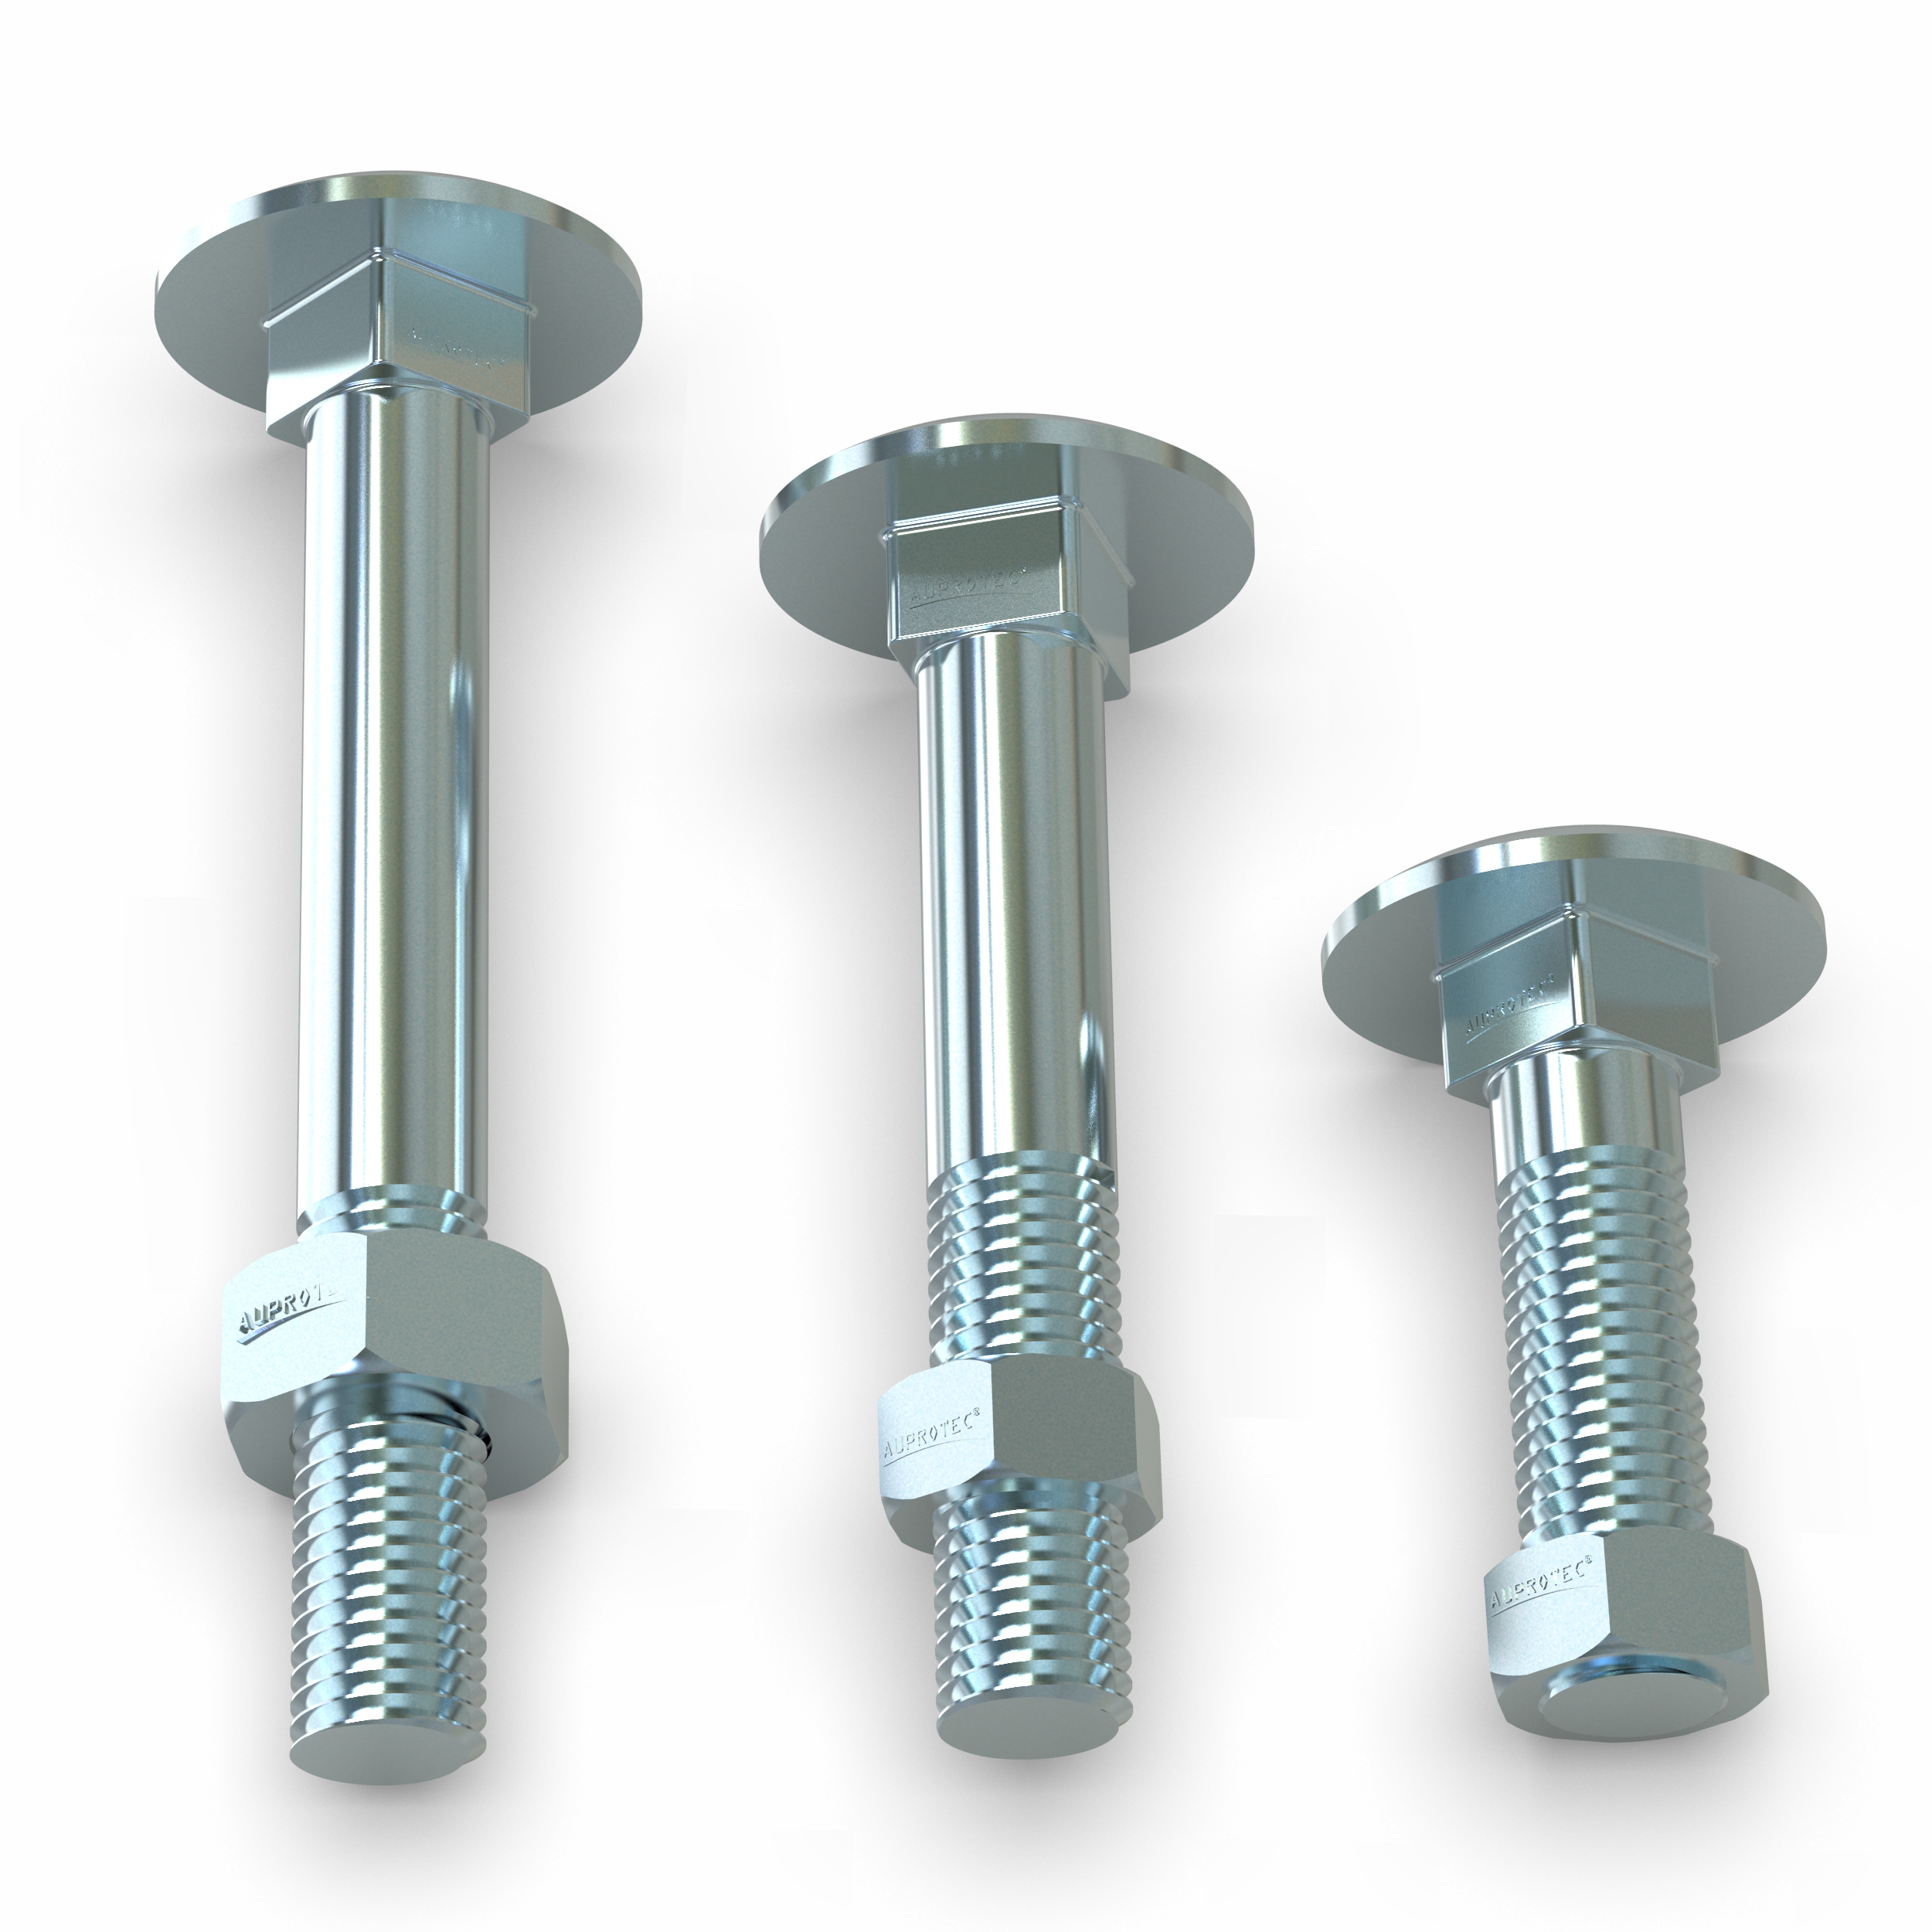
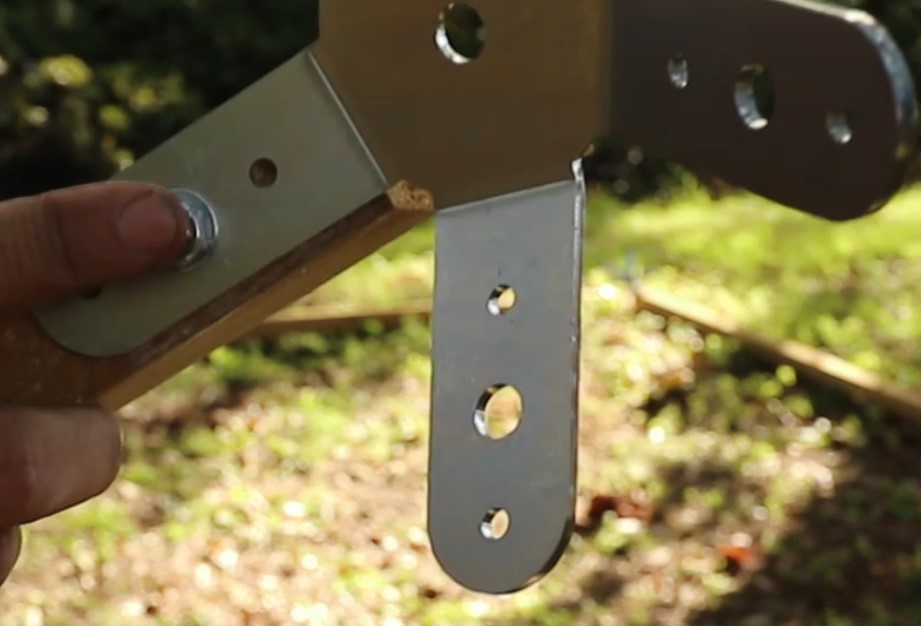
50 bolts: screws nuts washers. I strongly recommend carriage bolts (round head, square neck): one blow of the hammer and they will stay in the wood and not turn when you tighten them
OR 100 wood screws
Approximately 40m of 4-8mm diameter cord.
Tools needed
- cutting material for the posts: ideally a radial saw, otherwise a circular saw or a jigsaw
If you choose the bolts (recommended):
a drill a drill bit the thickness of the screws
a spanner or ratchet to tighten the bolts or an impact screwdriver (note: an impact screwdriver is NOT a percussion drill. An impact screwdriver allows you to screw or bolt much more strongly and quickly) or a simple screwdriver
a normal or rubber hammer (better) to drive your carriage bolts.
If you choose wood screws:
a normal or impact screwdriver
if you decide to pre-drill the studs, then a drill with a wood bit of a smaller diameter than your screws.
Screws and bolts size
If you choose to work with bolts:
The bolts should go completely through the thickest side of the post and the connector. I therefore advise you to choose a bolt length that is about 10 – 15mm longer than the thickest part of your timber.
For example, if your wood is 40x70mm, you will be drilling in the 70mm. So use an 80mm or 90mm bolt.
For thickness I recommend 8mm bolts (=M8)
If you choose to work with wood screws:
As with the bolts, you will screw into the thicker side of the wood. However, the wood screws should not protrude / pass completely through the wood. So use screws that are shorter than the thickest side of the wood.
For example, if your wood is 40x70mm, use 50 or 60mm screws. You can also use 40mm screws, but they will be a little less strong.
The diameter should be less than 5.2mm, so you can use 4mm or 5mm screws. The 5mm screws will be stronger than the 4mm screws.
Bolts or screws?
I recommend using bolts instead of screws. The assembly is much stronger, as the bolts are through-going. But above all, the assembly of the dome will be easier and can be done by one person with bolts.
It is not necessary or useful to use both bolts and wood screws. You will gain some strength but the thickness of the DOMESTAR connectors and the 8mm bolts are enough to guarantee a good assembly.
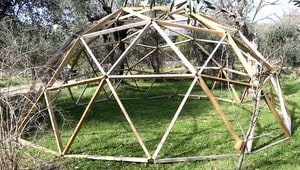
Choose the size of your dome
Domestar 1V connectors allow you to mount a geodesic dome in “frequency 1” which uses a single pole size: all your poles will be exactly the same size.
The size of the pole will determine the size of the dome. Height, radius and diameter are therefore determined by the length of the pole.
Here is a table with the possible dome sizes depending on the length of the post:
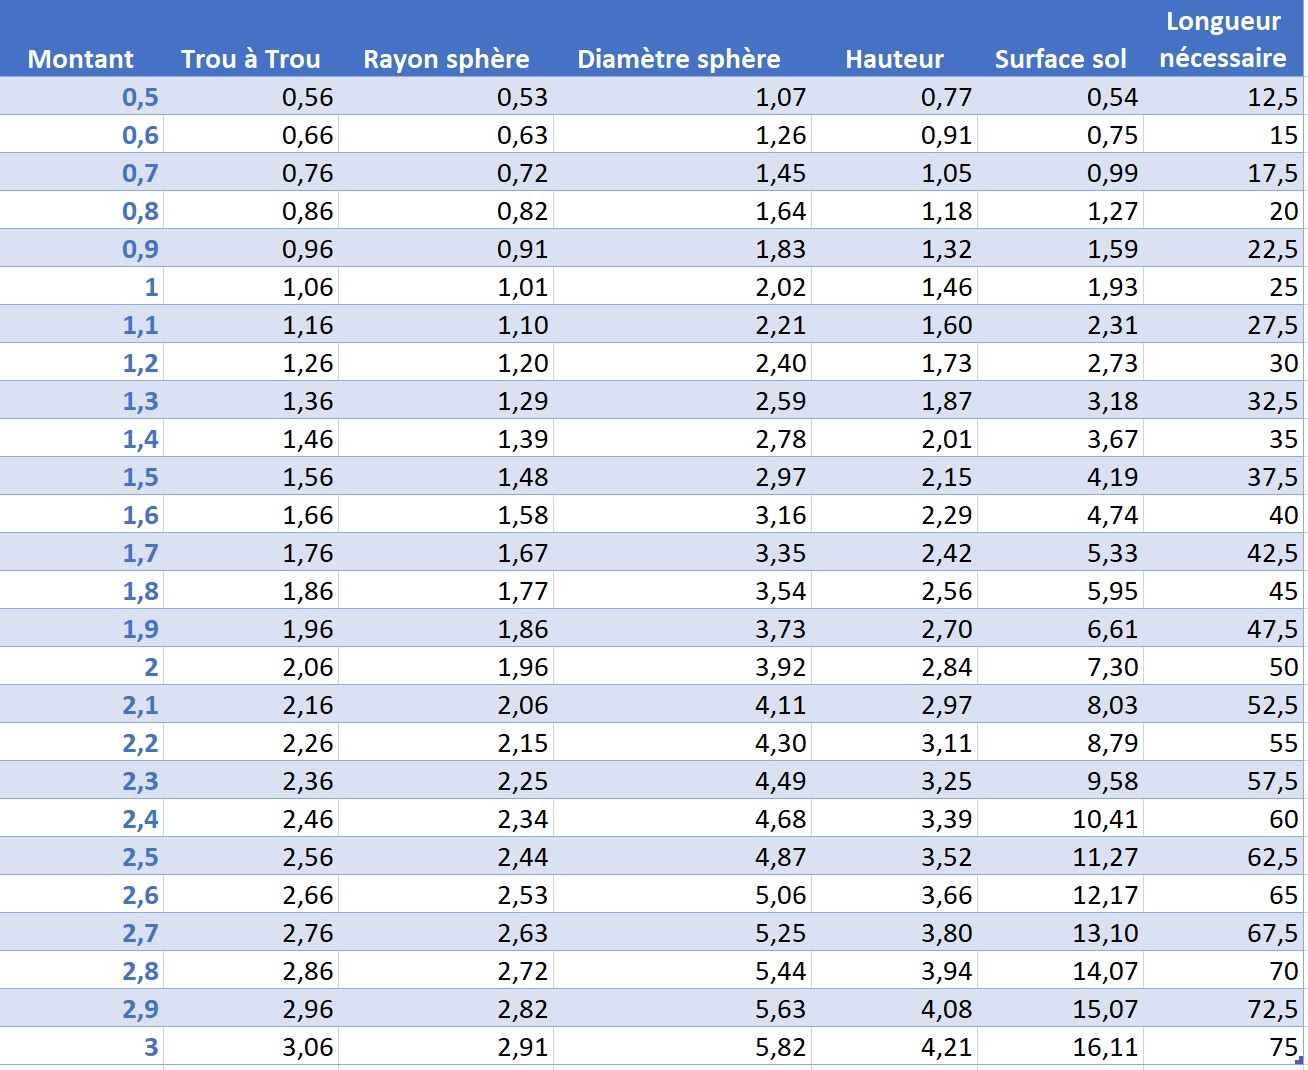
All measurements are in metres (m)
Upright: this is the size of the timber (rafter / joist) that you will use for the construction of the dome. All studs have the same size. For example 1.5 means that you have to cut all the posts to 1.50m.
Hole to hole: this is the measurement of the studs adding 2x 3cm to account for the size of the connector. This is the measurement of the distance between 2 central holes of the connectors.
Radius and diameter of the sphere at the widest point of the dome
Height: from the ground to the top of the dome
Ground surface: the surface of the base of the geodesic dome
Length required: total length of wood to be purchased for the dome if there is no wood loss
Example:
Let’s say you are using 2m long posts. Reading the line “2” under Upright tells us that the dome will have a radius of 1.96m, a diameter of 3.92m, a height of 2.84m and a floor area of 7.30m². You will need 50 linear metres of posts.
Table of post sizes according to the desired dome radius
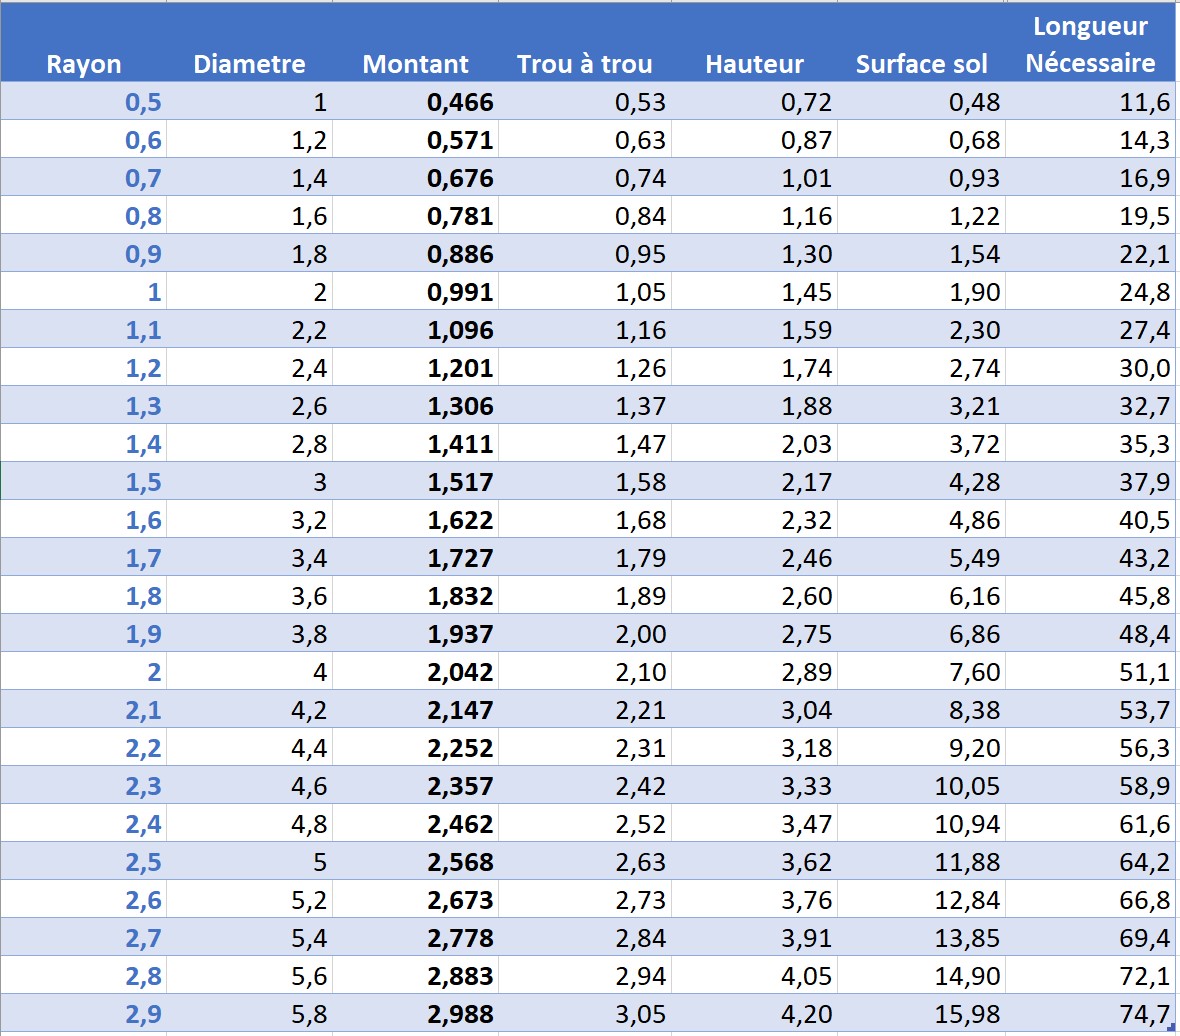
This table allows you to find the size of the posts to be cut according to the radius of the geodesic dome you want. The explanation of the rows is the same as above.
Example:
You want a dome with a radius of 2.30m. We will read the line “2.3” which tells us that you will have to cut your posts at 2.357m, and that your dome will have a height of 3.33m and a floor area of 10.05 m². You will need 58.9 linear metres of timber if you have no losses.
Which wood to use for geodesic dome posts?
I recommend using construction or decking timber which offers good strength at a fair price.
The MINIMUM length and width of the posts should be 30mm to ensure stability.
Deck joists are very interesting with dimensions of approximately 62x38mm or 70x45mm. The joists are also often treated to class 3 or class 4 which gives this wood a very good resistance to rain.
Construction rafters / half rafters (in the websites of large building stores, type in “construction timber”) are often even cheaper and thicker with dimensions 75×50, but their treatment and rain resistance is often inferior (usually class 2 – this is yellow coloured timber)
TIP: choose your own wood in the big building stores. Make sure the wood is not twisted or warped. Twisted joists will make the assembly of your geodesic dome much more difficult!
TIP: optimise your wood purchase according to the size of the upright you choose. If you are going to use 130cm posts, then a 240cm joist will take a lot of waste. On the other hand, 400cm wood will only take 10cm of waste per 3 studs. You can even fine-tune the size of your studs to suit your wood: in the example above, you can decide to use 133cm studs to have almost no fall.
TIP: If you are going to treat the wood I would advise you to do it after cutting the wood but before assembling it: it will be easier to paint/spray the wood flat rather than once the geodesic dome is assembled.
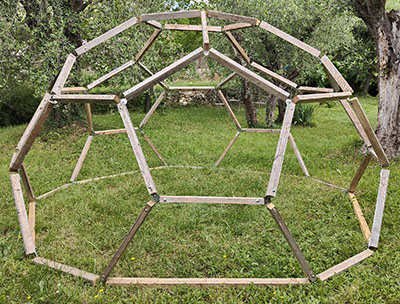
Here are the main stages in the construction of the geodesic dome
- Cutting out the posts
Drill all studs
Insert all screws
Attach all connectors, 1 per post
Place and fix the base
Fix the walls with the support cords
Attach the top belt
Remove the cords
Attach the roof
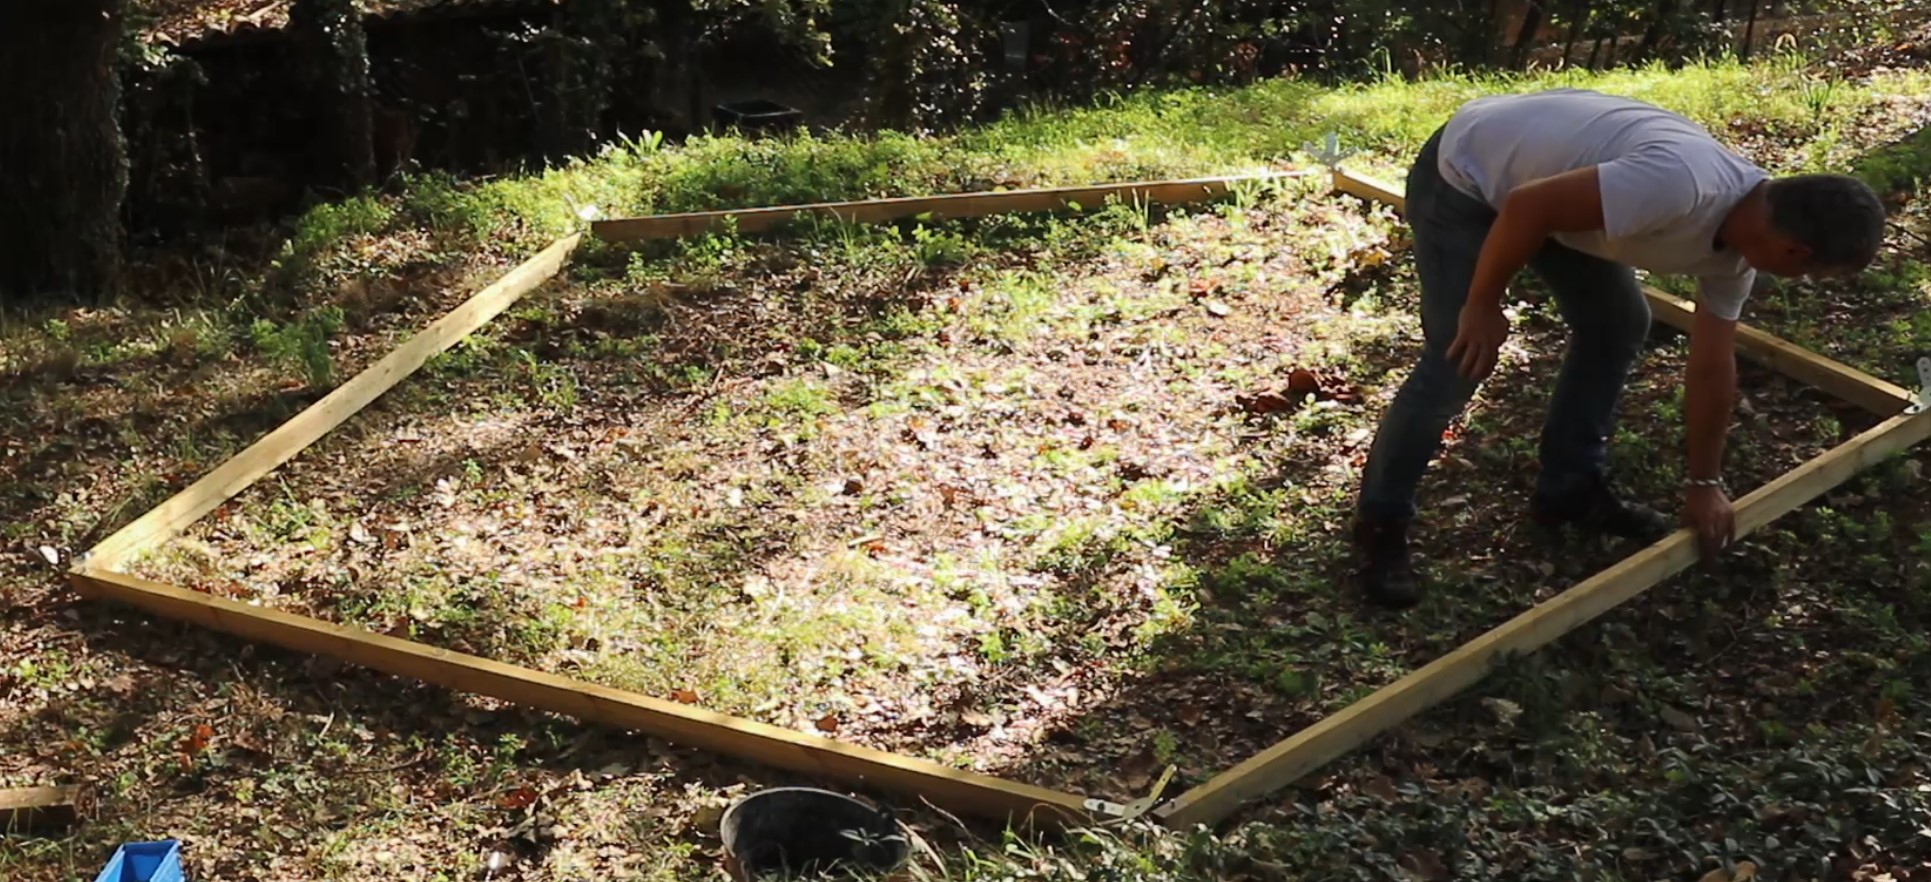
Preparing the location of the geodesic dome
After determining the diameter of the geodesic dome using the table above, make sure that you have enough space for your dome and that the space is flat enough.
Cutting out the posts
All the posts should be exactly the same size.
Start by cutting out the first upright and check that its length is exactly what you want.
Use this first upright as a template: draw the cutting line on the wood to be cut using this upright. Remember to cut just after the cut line, not on the cut line to allow for the thickness of the board.
You now have 25 identical posts.
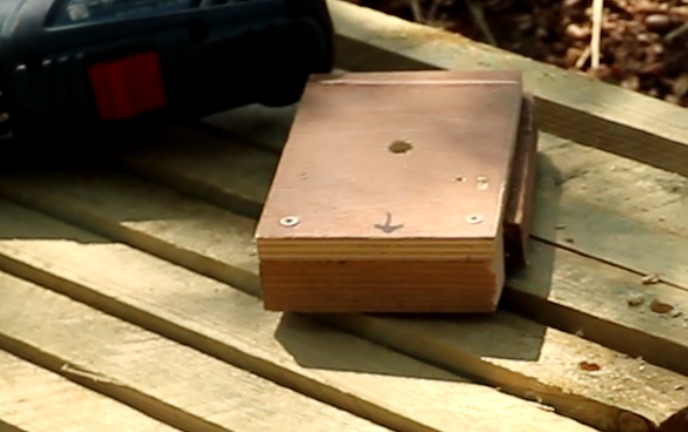
Bevel some joists if necessary
Depending on the thickness of your joists, it may be necessary to bevel some joists before assembly to prevent them from touching each other on the connector.
More information on bevelling and joist bracing.
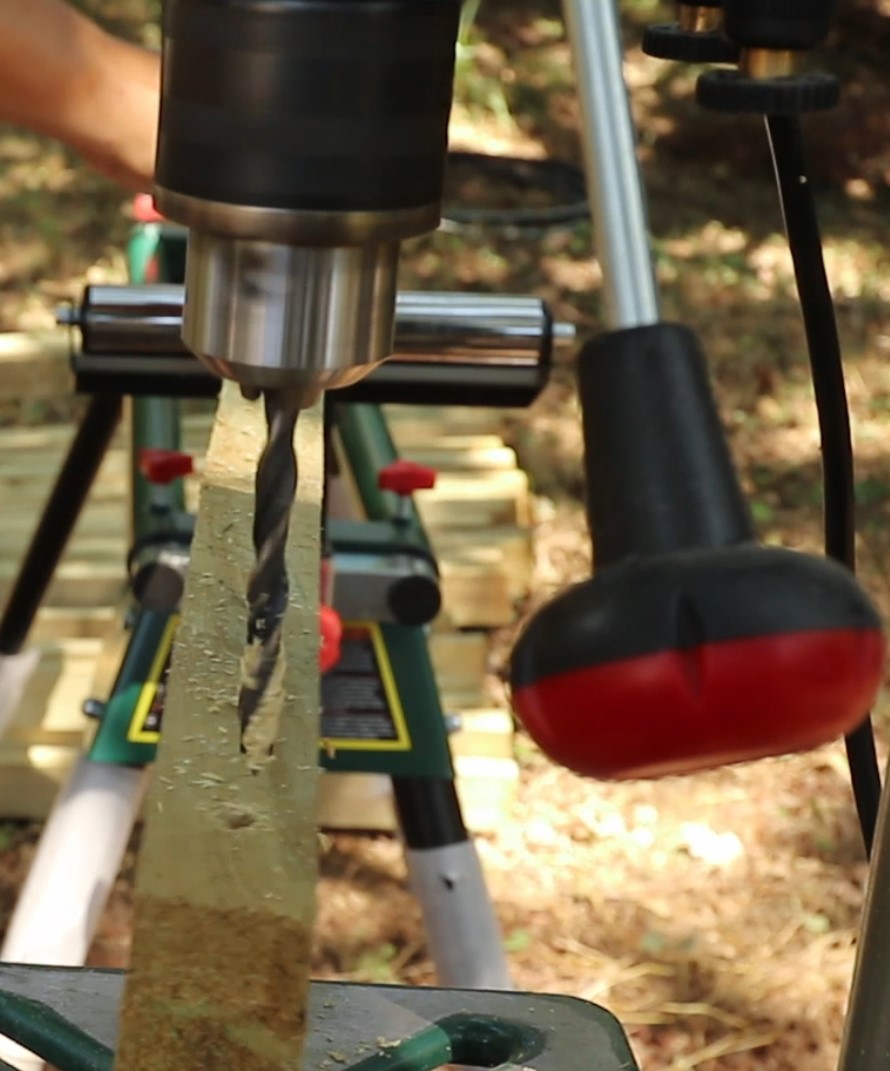
Drilling the posts
With the use of bolts (recommended):
Now it is time to drill the posts to accommodate the bolts. Here again, great precision will help you with the assembly.
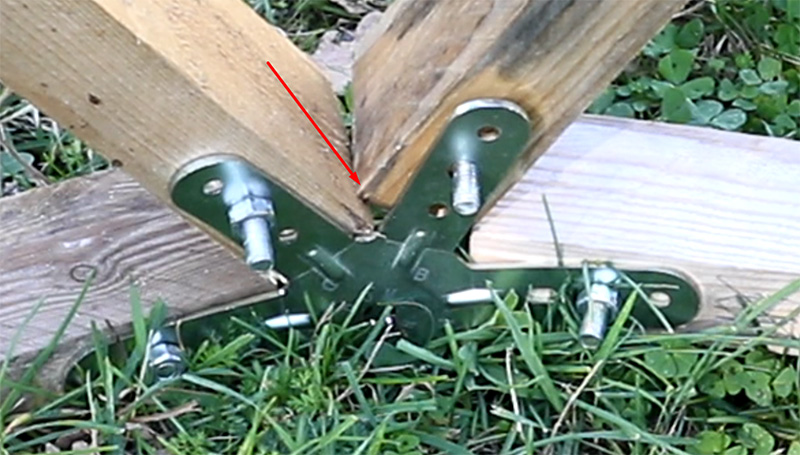
The bolt hole should be 40mm from the end of the post.
You must drill through the LONG side of the post to ensure maximum stability of the dome.
Gain precision by making a drilling pattern
I strongly recommend that you create a drilling pattern for yourself.

Make your first hole on one side of the first stud with great precision.
Mark the side where your drill bit entered: as you may not drill straight, only the side where you started drilling is accurate. The exit side may be off. This is not a problem, but to be accurate you need to rely on the entry side.
Now turn the post over and place a small wooden plate underneath. Screw wedges tightly around this wooden plate against the jamb.
Finally, drill the wooden plate through the jamb, entering the drill bit through the EXIT hole.

Your pattern is ready.
Now complete the 2×25 holes in the studs using your pattern and trying to drill as straight as possible. If you have a drill press, now is the time to get it out.
Mark the side where you put the drill bit in: this is the side that will be put against the connectors, as it is the most accurate side.
Insert the 50 bolts into the holes. Be very careful with the direction of insertion: insert the bolts through the OUTPUT of your drill bit. This way the end of the bolt is on the inlet side of your drill bit and it is this side that will be against the connector.
Use the hammer to ensure that the square part of the carriage bolts goes into the wood.
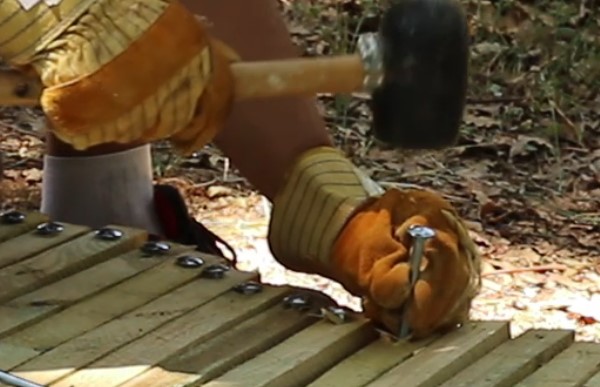
Tip: If the hammer is not enough you can use a screw and washer and tighten the bolt so that it goes into the wood.
When using screws:
You may decide to make pre-drilled holes at the end of the studs. To do this, choose a drill bit with a smaller diameter than your screw. For example, if you are using 5mm screws, choose a 4mm wood bit.
Carefully drill using a DOMESTAR connector as a guide 2 pre-drilled holes at each end of the stud, drilling the LONG side of the stud. Make sure you are centred.
You can also create a pattern for yourself using the same technique as in the section above.
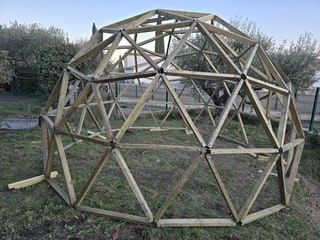
DOMESTAR connectors inside the dome
In theory, you can use the DOMESTAR connectors inside or outside the dome. Even if you have 2 kits inside AND outside for maximum solidity. However, for a standard assembly I advise you to use your connectors inside the dome and it is this advice that I will follow in this guide.

Attaching the DOMESTAR connectors
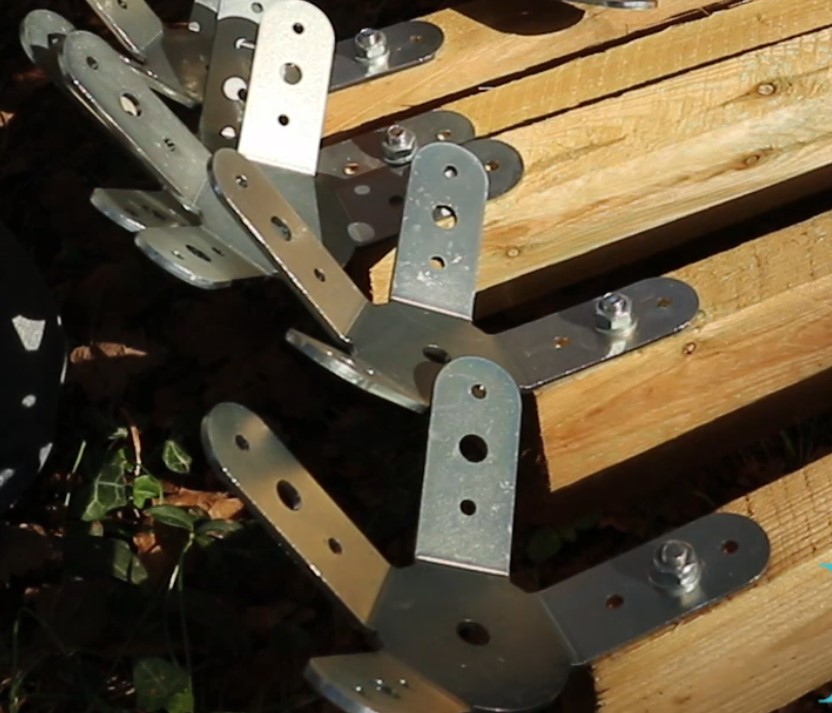
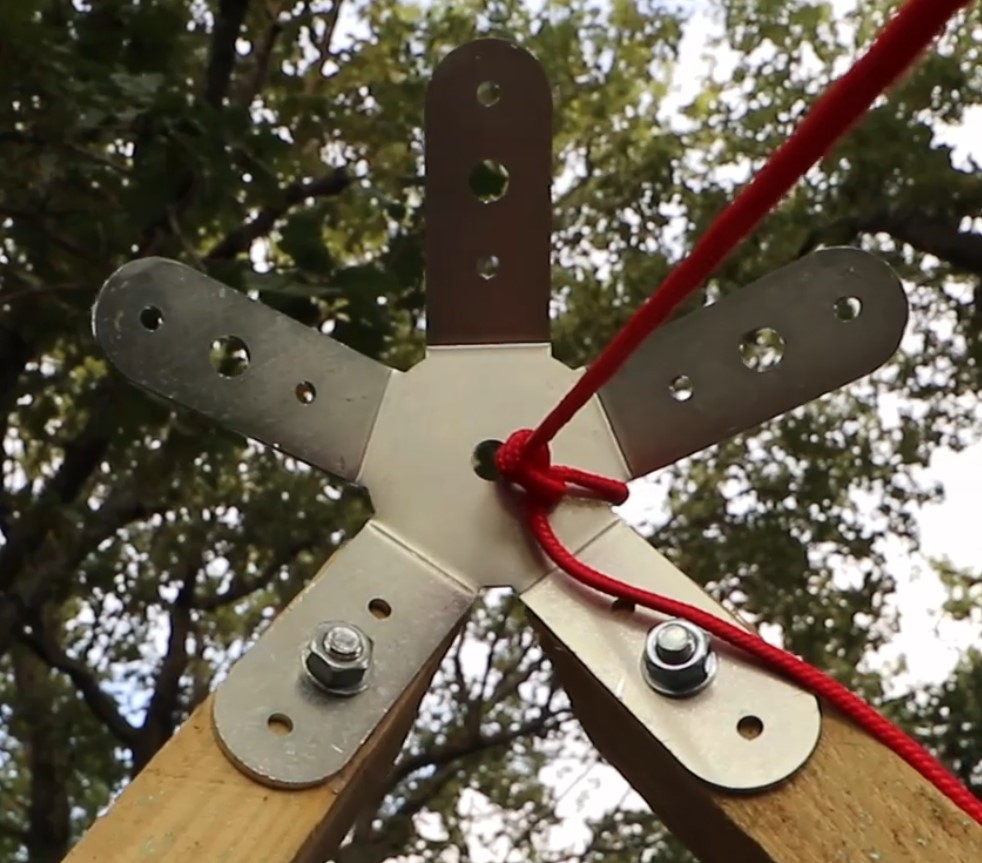
Take the 5 DOMESTAR 4-pin connectors and 5 posts.
Screw / bolt 1 4-pin connector to each of the posts. Use an outer leg of the connector.
Take the last 6 DOMESTAR 5-way connectors and screw / bolt 1 connector to 6 new posts.
You now have 11 posts with connectors attached and 14 posts without connectors.
The assembly of the dome base
General advice: during assembly do not overtighten your bolts in order to leave some flexibility in the assembly. Only once everything is assembled do you have to re-tighten all the bolts.
Lay out the 5 posts with a 4-pin connector on the floor in a pentagram shape. Put these 5 posts already in the final location of your dome: it will be heavy to move when you have finished the assembly.
Think carefully about the orientation of your geodesic dome: where do you want the points and where do you want the straight edges?
Now assemble the 5 posts using the free outer leg each time.

TIP: If you are planning to anchor your geodesic dome, now is the perfect time. The base can still easily be moved to make room for anchoring. The section on anchoring the geodesic dome is at the end of the manual.
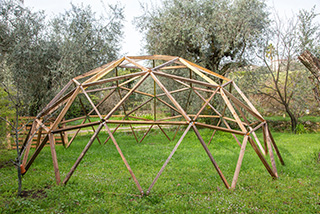
Geodesic dome wall assembly
VERY IMPORTANT WARNING: for this step you must use rope to support the walls while the high belt is being assembled. If you don’t use cord the walls will sag and bend the connectors!
So for this step prepare 5 cords (diameter 4-8mm) of a length equal to the diameter of your dome 2 meters (i.e. 6m cords for a 4m diameter dome)
Attach each of these cords to the centre hole of each 4-branch connector on your base.
Take a new post to which you have screwed a 5-branch connector and temporarily attach the other end of the cord at the opposite corner.
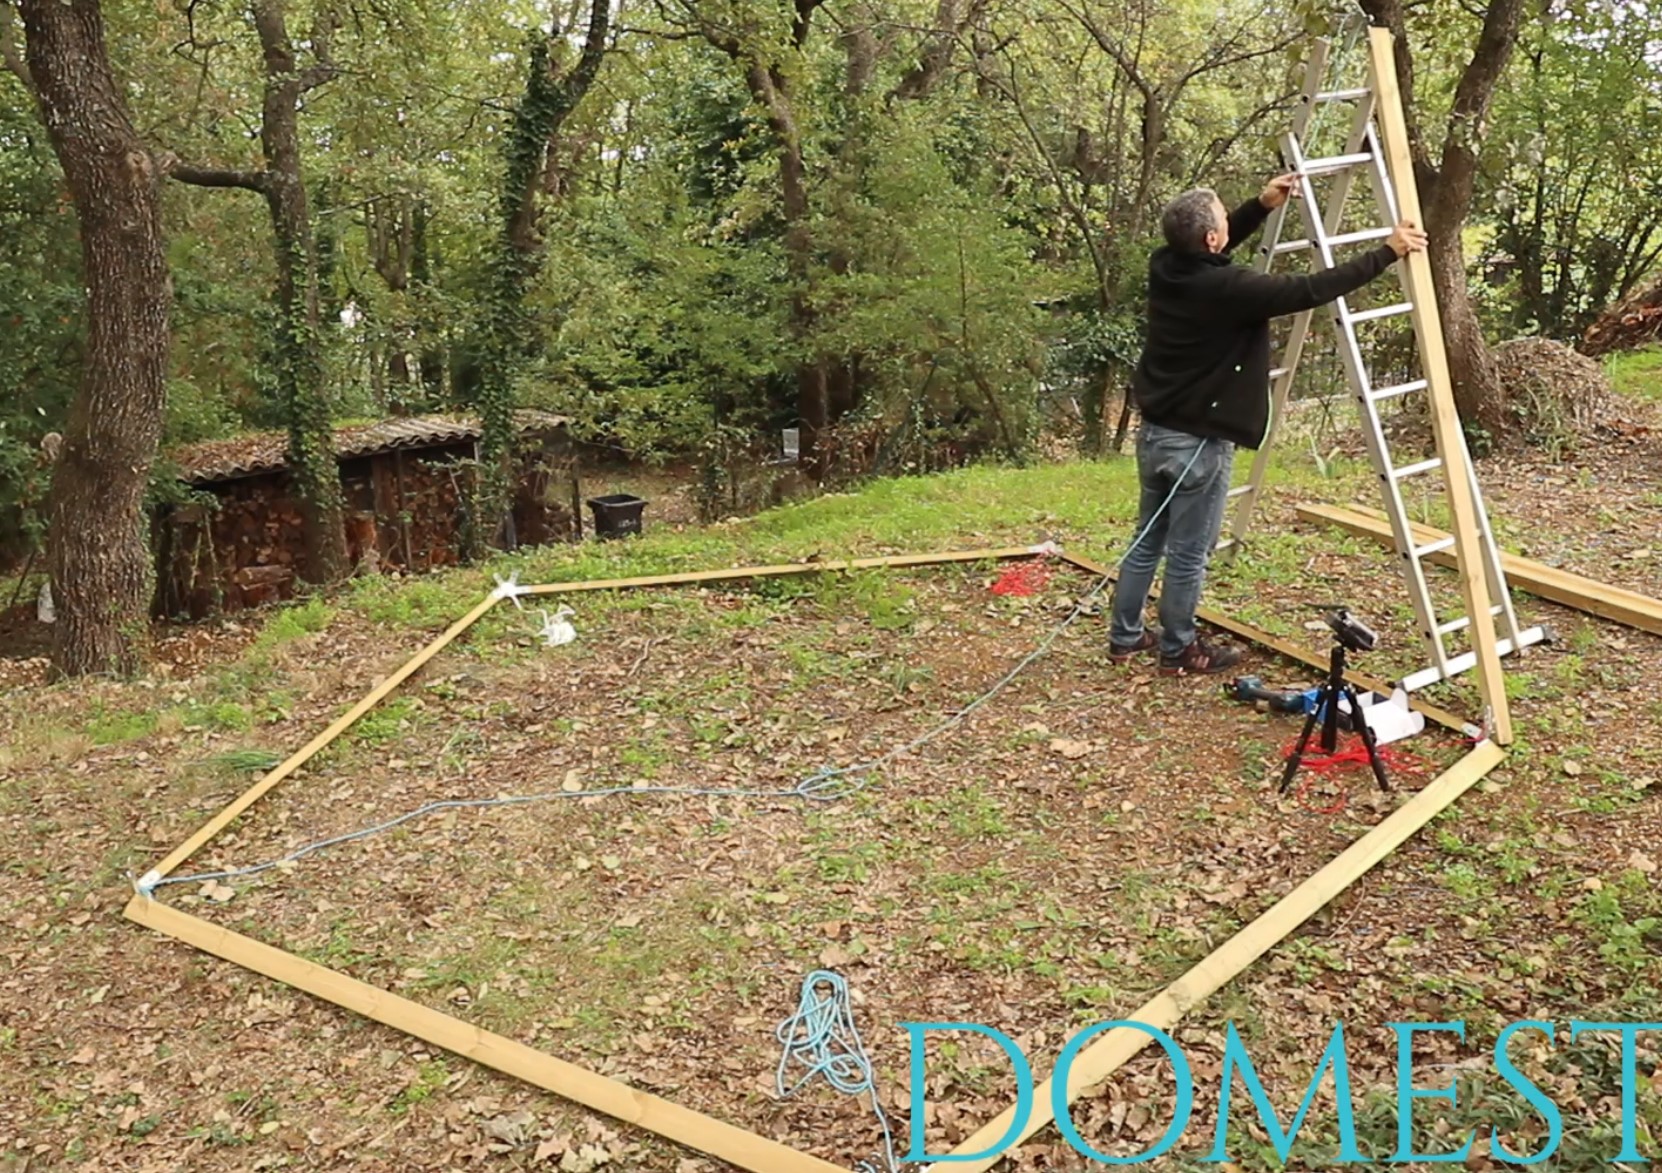
- Screw / bolt the upright to an inner leg of a 4-branch connector of the base. For this operation you can get help from a person holding the upright or from a ladder that will hold the upright while you screw / bolt. This new upright must be supported while screwing.

- Take a new upright without a connector and bolt / screw it to the next 4-branch connector on the base to form a triangle while supporting the top on the ladder

- Finish the triangle by screwing / bolting the top of the triangle.
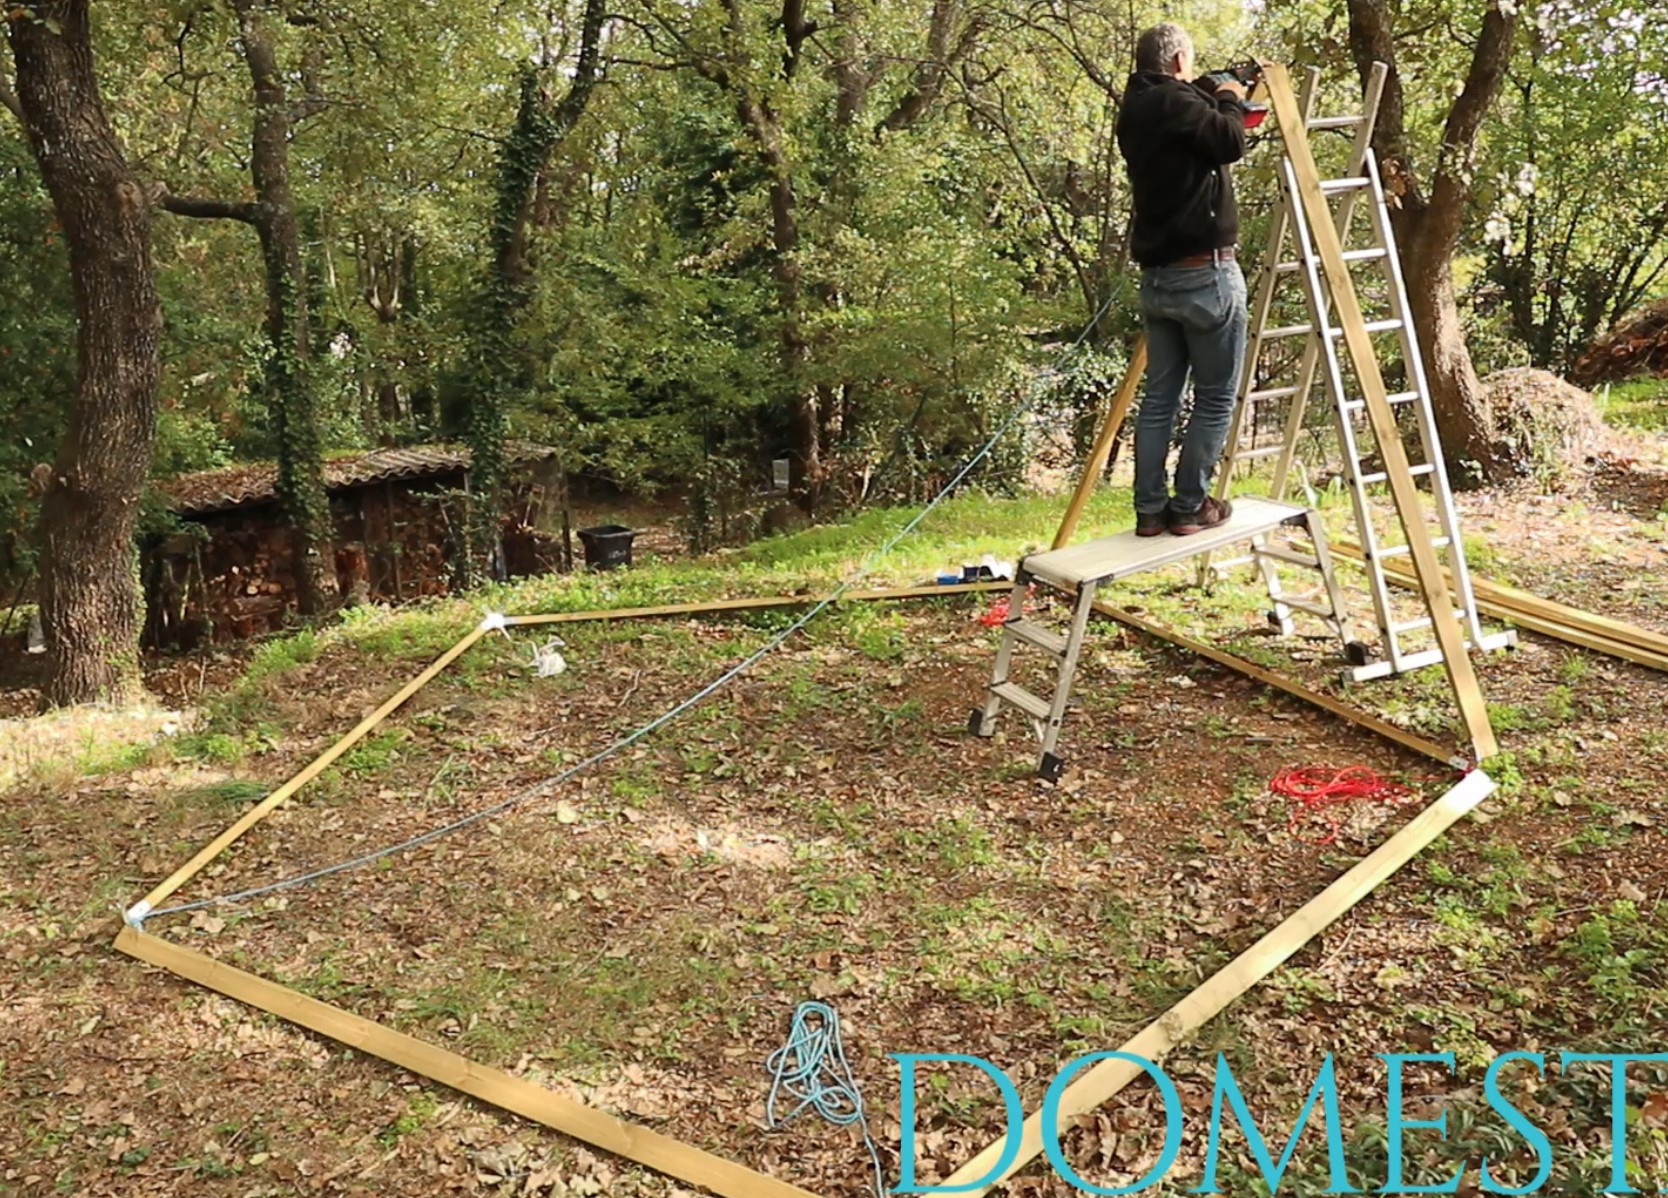
- Tighten and tie the cord: the top of the triangle should extend a little beyond the base (the projection of the top of the triangle should be a little outside the base). This cord should support the triangle throughout the assembly of the walls and the high belt.
- Repeat the operation 5 times in total to finish the walls.
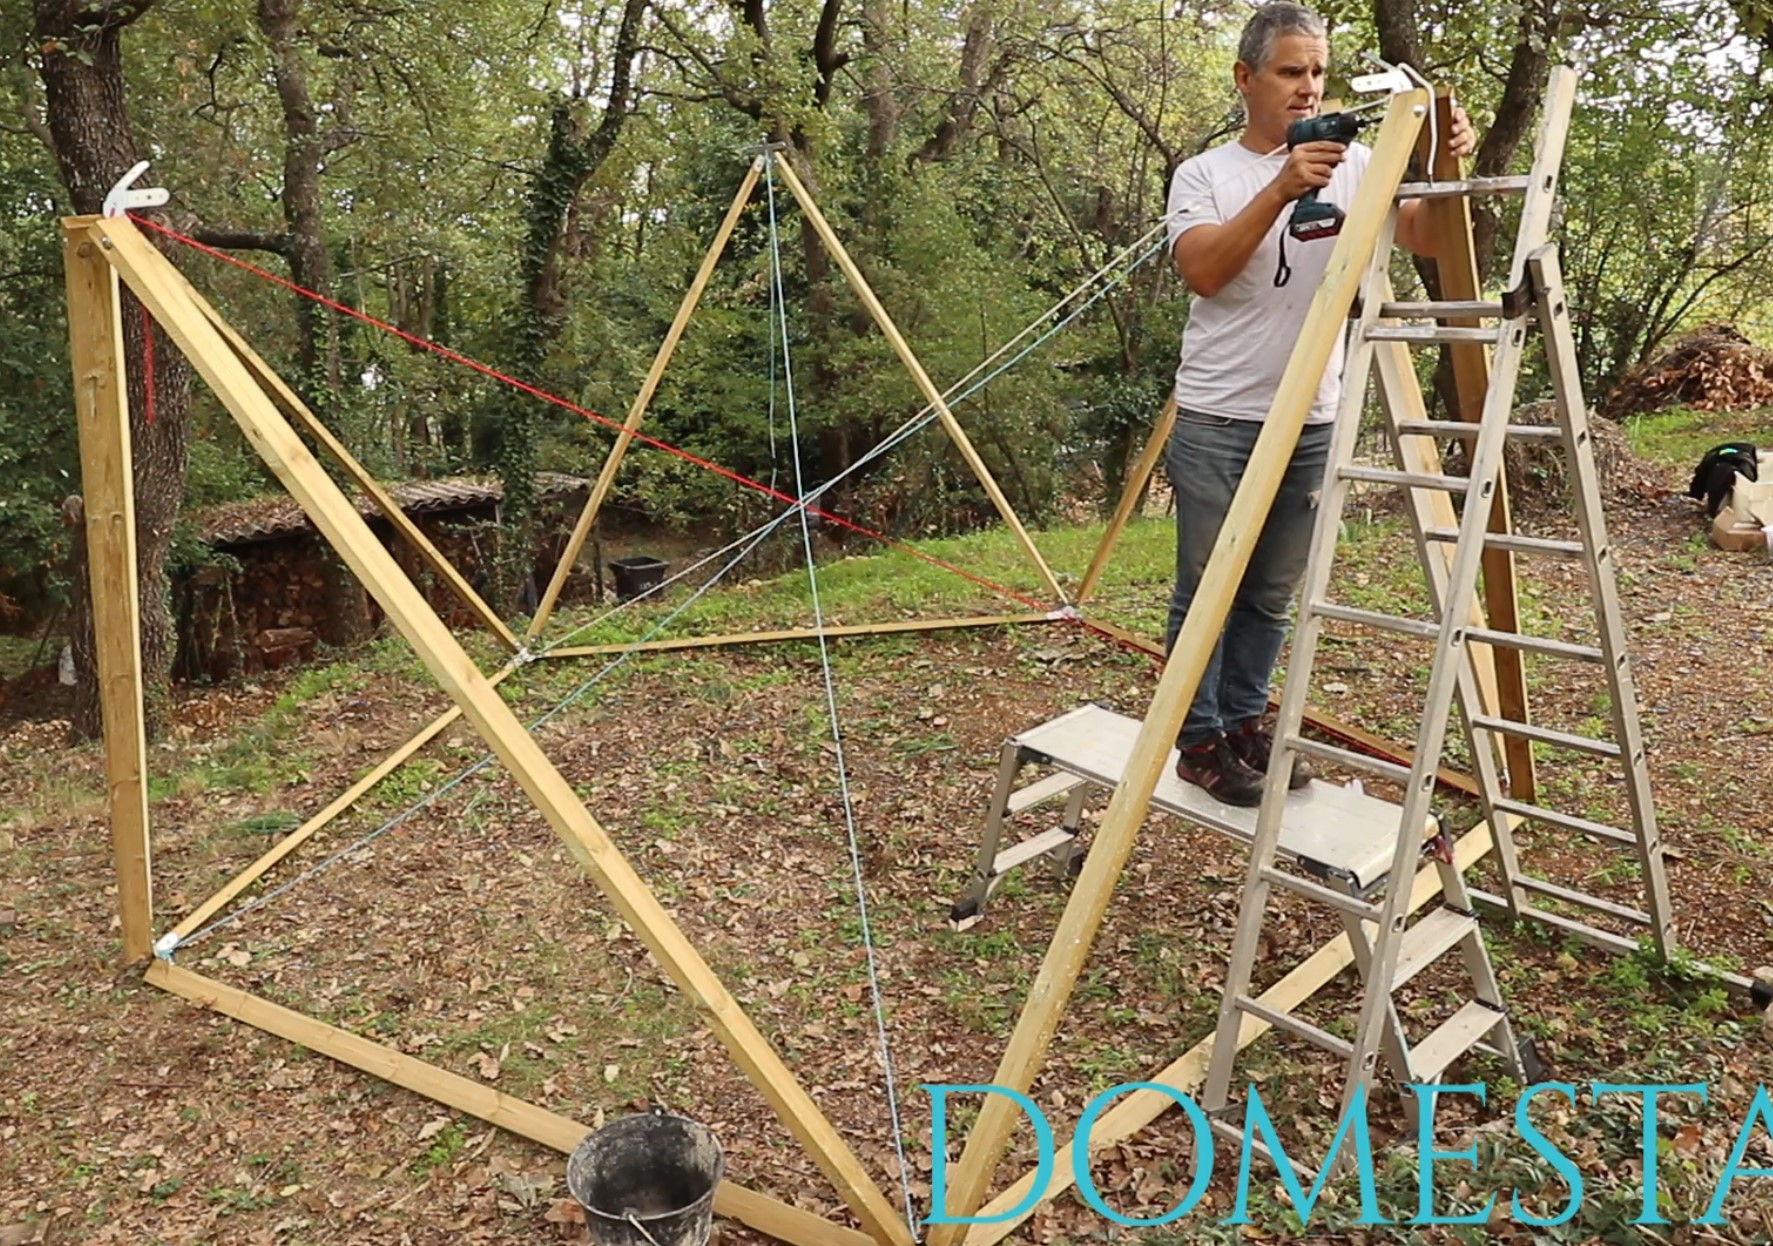
Assembly of the high belt
With 5 new posts without connectors connect the points of each triangle to create the high belt.
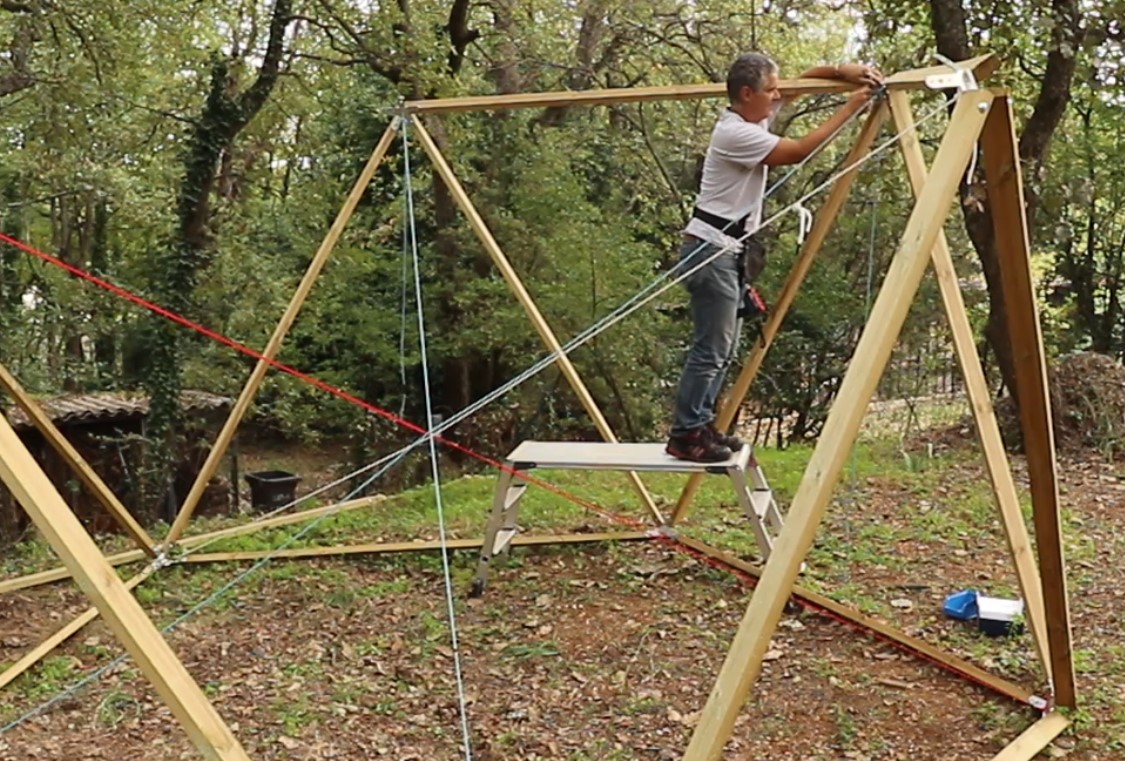
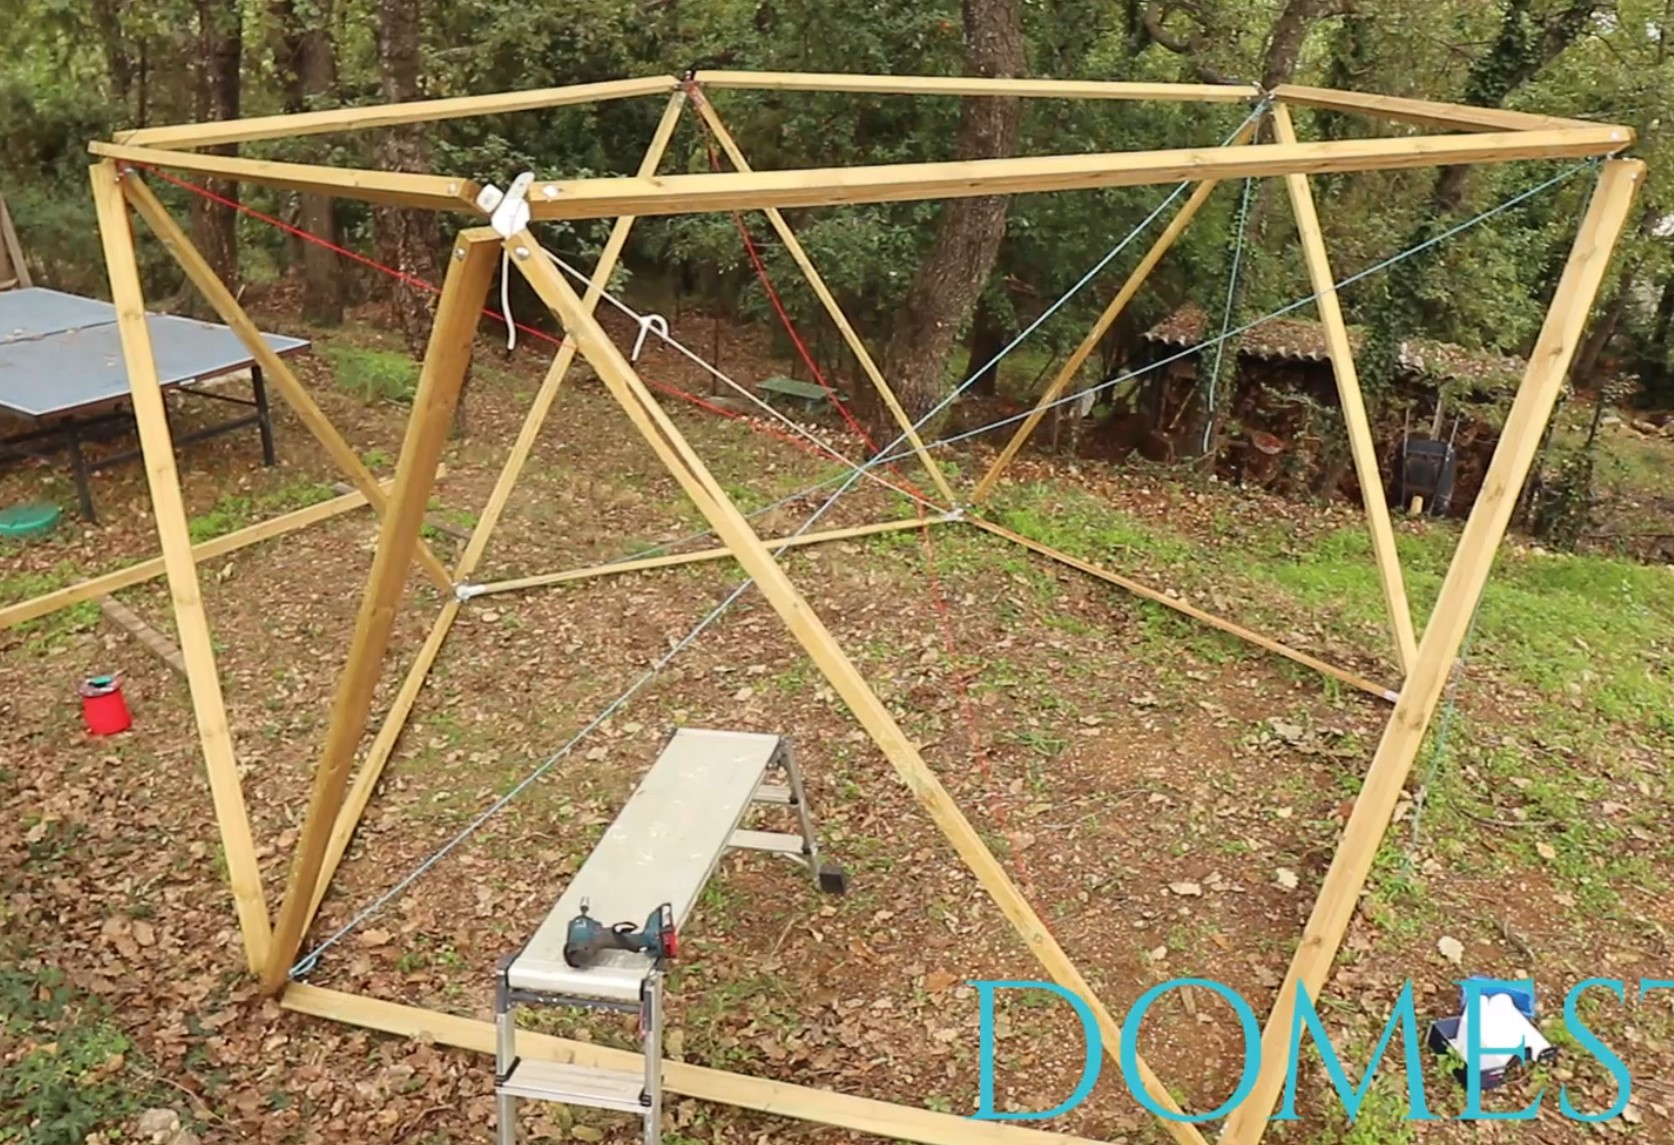
Once the high belt is in place you can remove the 5 cords.
Roof assembly
You now have 5 posts left, 1 of which has a 5-pin connector.
I advise you to put a large support ladder in the centre of your geodesic dome on which the posts will rest before assembling the final connector.
Screw / bolt the new upright with the last connector to the top point of a triangle. The top of the upright can be supported by the ladder.
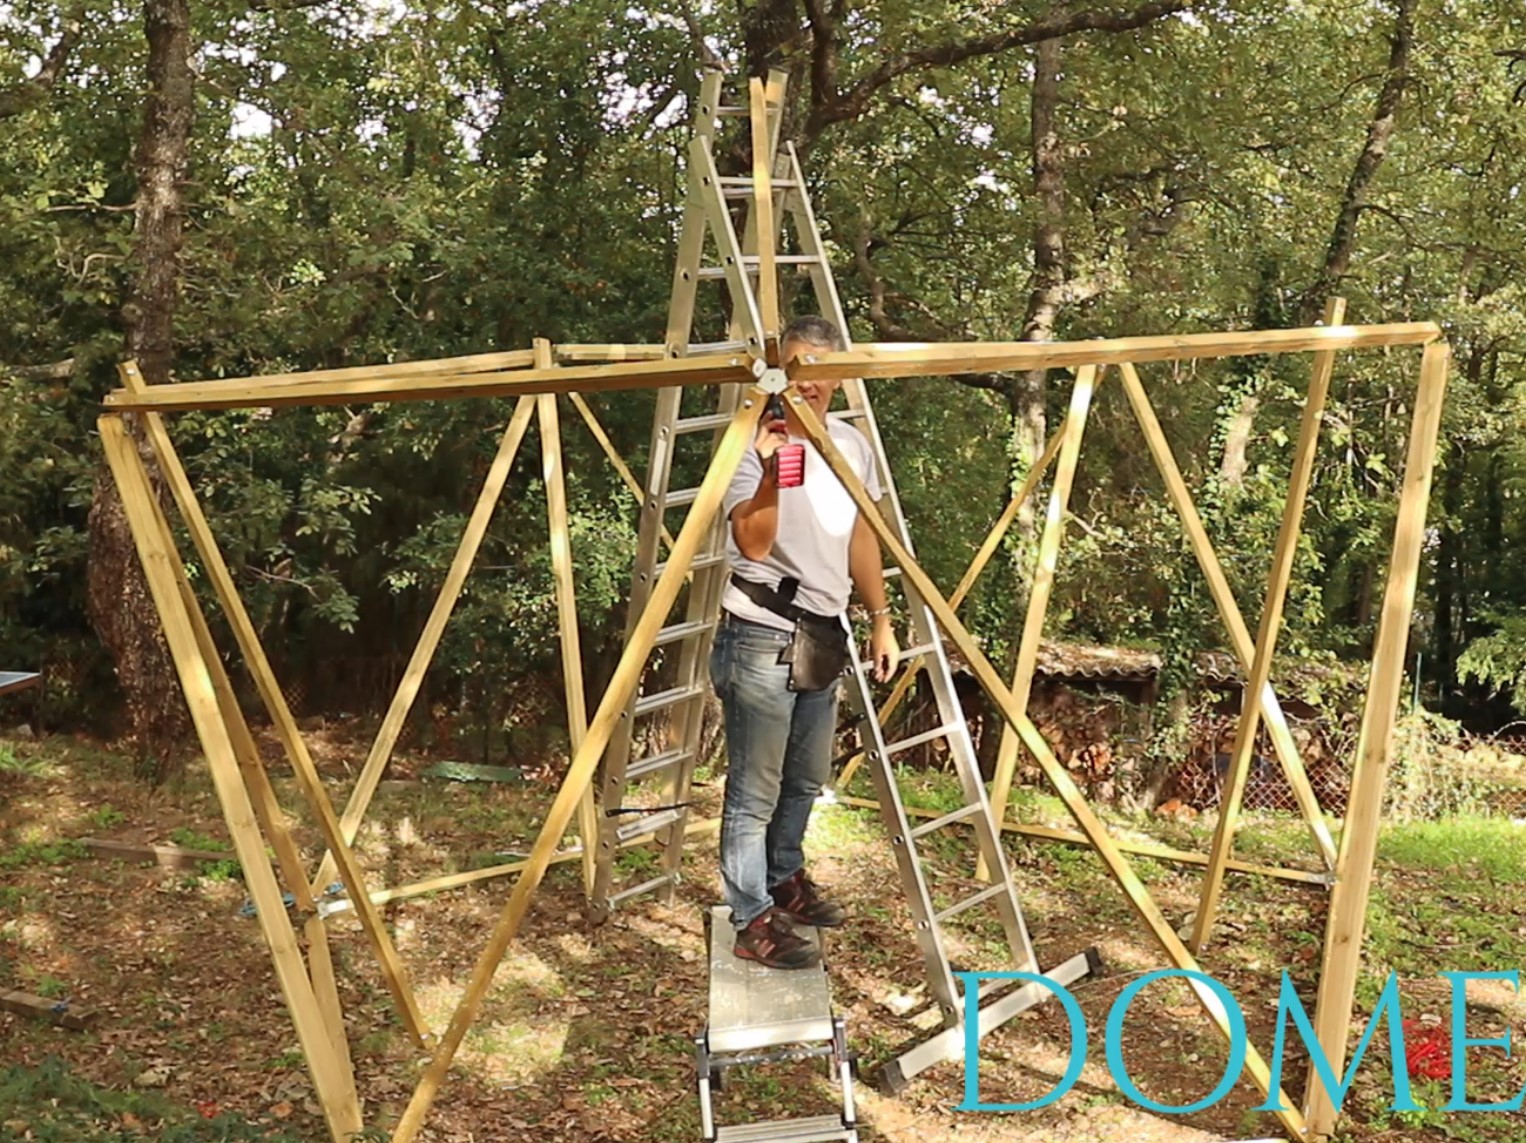
Repeat for the other 4 posts
Now assemble all the posts at the top of the geodesic dome.

And finally tighten everything
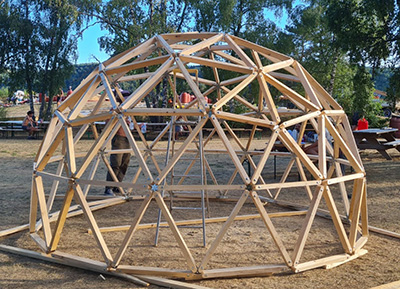
Your dome is now finished!
Tighten all the bolts to ensure that it will last for a long time.
BRAVO, you have just finished the structure of your DOMESTAR geodesic dome.

Anchoring the dome
The circular shape of the geodesic dome gives it excellent resistance to most forces. That said, if you cover your dome it is essential to anchor it to the ground if you do not want it to become a UFO and fly off into the neighbourhood.
Anchoring with rebar
Bend 5 or 10 pieces of 70-75cm of 8mm or 10mm rebar into a U. With a hammer, drive these U-shaped pieces of rebar onto the base of the dome at a rate of 1 or 2 U-shaped pieces per base post.
Anchoring with threaded rods and mortar
(coming soon)
Where to buy the necessary materials?
If you have any tips to share about buying equipment, please write to me and I’ll post them here!
Bolts
For bolts I found the best prices in Europe at auprotec(website) with fast delivery and reasonable prices.
TIP: it is often worth buying 100 bolts instead of 50 because of their policy of reduced prices according to quantity.
Direct link to carriage bolts